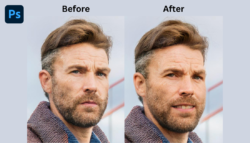
Artificial Intelligence has revolutionized the world of digital art, and Adobe Photoshop is at the forefront of this transformation. It’s crazy how much these AI features in Photoshop reduce editing time, and I’m excited to show you my top three AI tools on the platform!
Whether you’ve been using Photoshop for years like me or are just starting out, integrating AI into your Photoshop workflow will take your creations to the next level.
In this guide, I’ll show you how to harness the power of AI in Photoshop to work smarter, faster, and more creatively.
Understanding AI in Photoshop
I’ve been using Photoshop for over five years, and the recent AI additions have been a total game-changer for me.
What is Adobe Sensei? How does it power Photoshop’s AI features?
When I first heard about Adobe Sensei, I wasn’t exactly sure what it was. A new Creative Cloud Application?
It turns out that it’s the brains behind Photoshop’s AI features.
Adobe Sensei is Adobe’s artificial intelligence and machine learning platform. It powers all the smart features that make our lives as editors so much easier!
3 Key AI Tools & their Functions in Photoshop
Some of the key AI tools you’ll find in Photoshop include:
- Content-Aware Fill: This tool uses AI to intelligently fill selected areas of an image by analyzing surrounding pixels. It’s great for removing unwanted objects from photos!
- Neural Filters: These AI-powered filters can do complex edits like changing facial expressions or smoothing skin.
- Select Subject: Sensei can automatically detect and select the main subject in an image with a single click.
I’ll show you how to use each later in the article.
Benefits of Using AI in Your Editing Workflow
I’m not going to lie. When I first started using these AI tools, I was a bit skeptical. Could they really do a better job than my years of hard-earned Photoshop skills? However, I’ve found the benefits of incorporating AI into my workflow huge!
For one, it’s saved me so much time! Tasks that used to take hours now take minutes. Thanks to these AI tools, I can take on more projects or spend more time on the creative aspects of my work.
It’s also helped me achieve more consistent results. We all have days where our selection skills aren’t entirely on point, right? With AI, I get great results every time.
However, AI isn’t perfect. Sometimes, it’s off and misses subtle details.
That’s why I think it’s important to understand these tools and know when to step in and make manual adjustments. It’s all about finding that sweet spot between AI efficiency and human creativity!
Mastering Content-Aware Fill with AI
When I first started using Photoshop, removing unwanted objects was a nightmare. I’d spend hours clone stamping and healing, only to end up with results that didn’t look so great.
Then, along came Content-Aware Fill, and it was like magic!
The AI in Content-Aware Fill is pretty smart. It analyzes the surrounding areas of your image to determine what should replace the object you’re removing. It looks at things like color, texture, and lighting to create a seamless fill.
However, it’s worth noting that this tool isn’t always perfect. Don’t be surprised if it creates weird patterns or textures that look off. You can always make refinements or manual adjustments.
Step-by-Step Guide to Using Content-Aware Fill
Allow me to walk you through how to use Content-Aware Fill in Photoshop.
In this example, I generated an image of a teapot and a green glass water bottle using Photoshop’s new AI image generator:
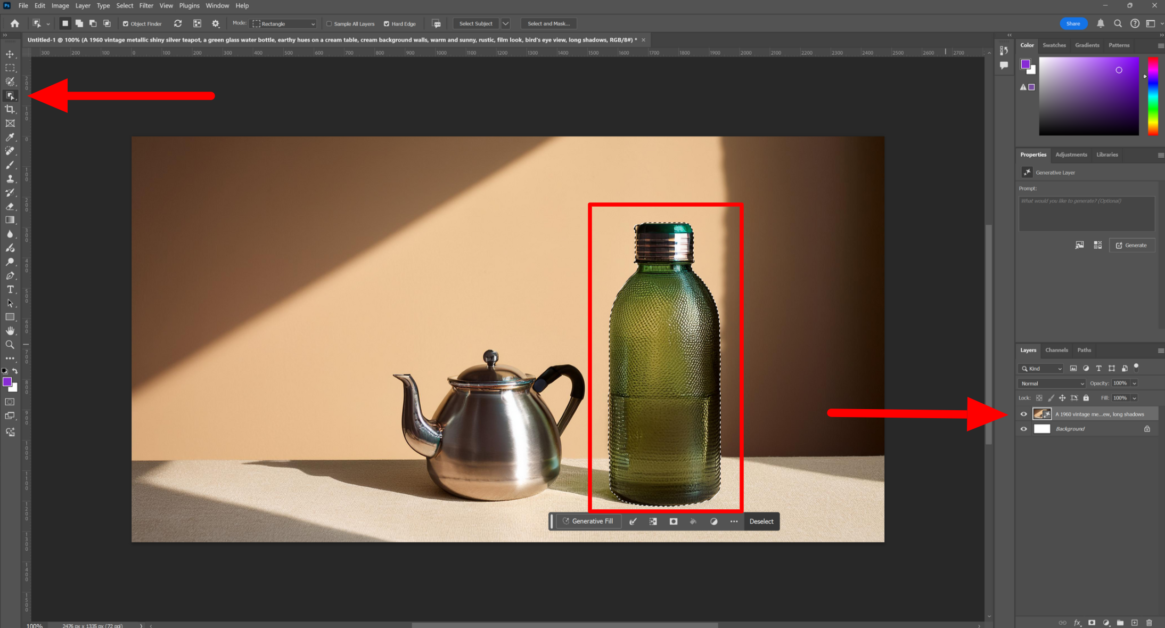
1. With the image selected in the Layers panel, select the object you want to remove (in my case, the green water bottle). You’ll know it’s selected if you see marching ants around it. I used the Object Selection tool (another AI gem), which is great for this.
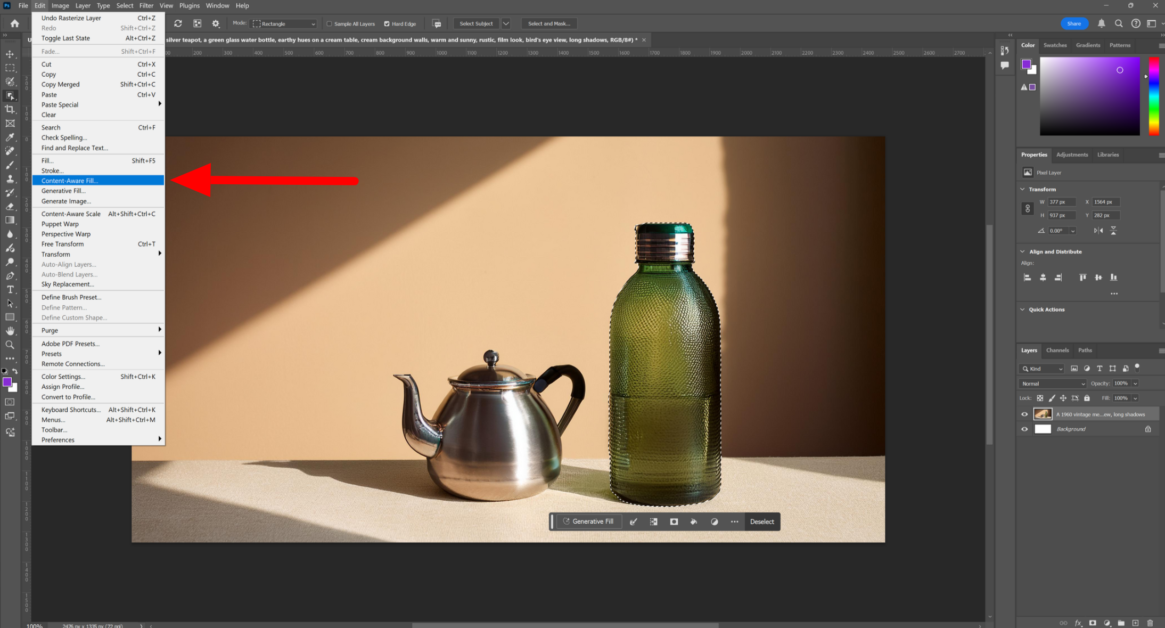
2. Go to Edit > Content-Aware Fill. If you generated your image with AI, you’ll need to right-click on the image in the Layers panel and rasterize it to be able to select Content-Aware Fill.
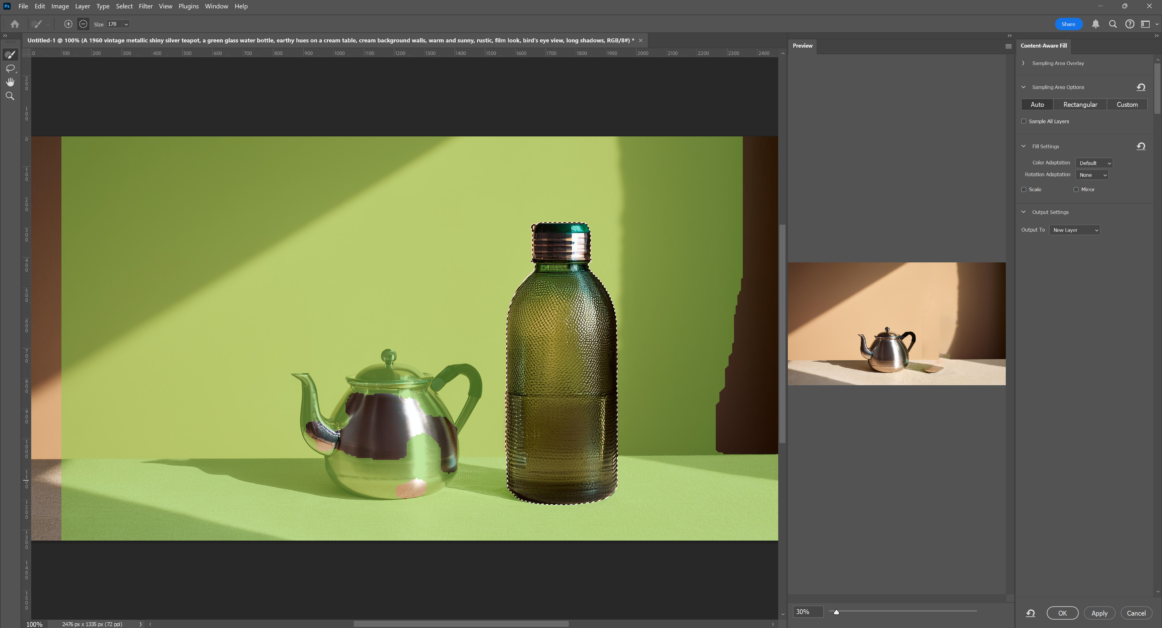
3. In the Content-Aware Fill workspace, you’ll see your image with the selected area highlighted.
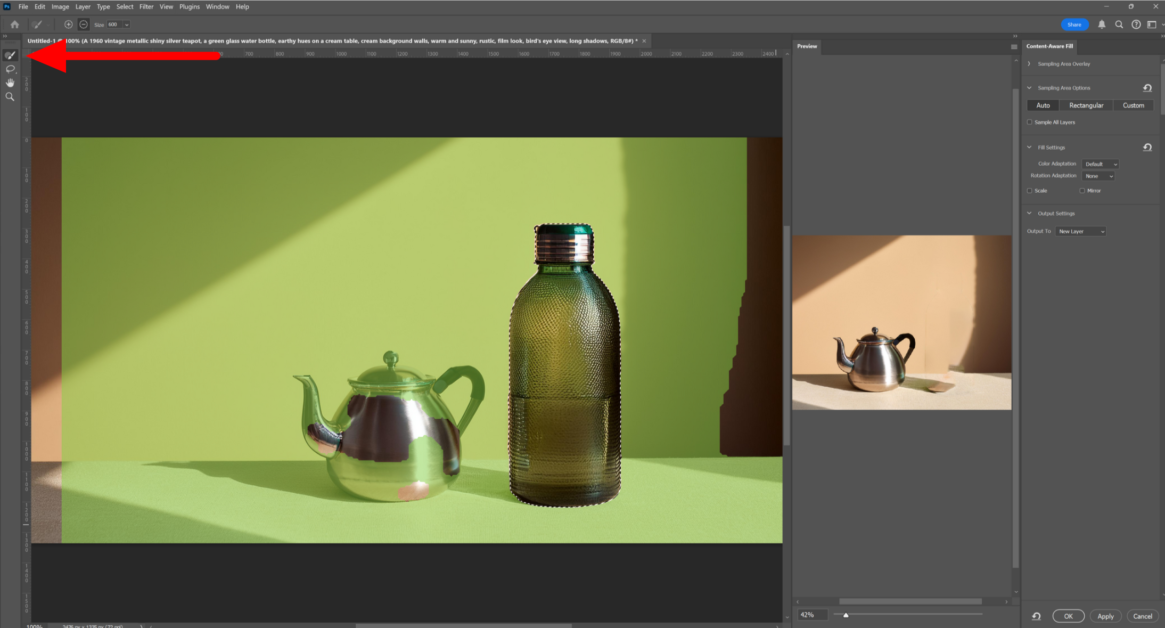
4. Use the sampling brush to paint over areas you want Photoshop to use as a reference.
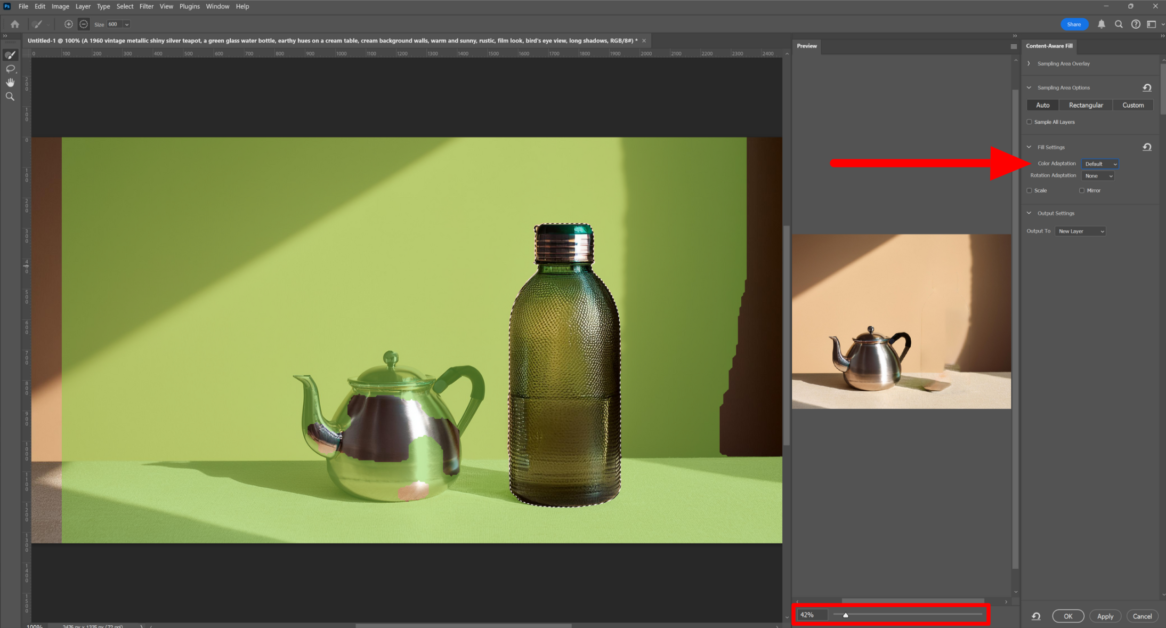
5. Adjust the settings on the right panel. Play with the Color Adaptation and Scale sliders.
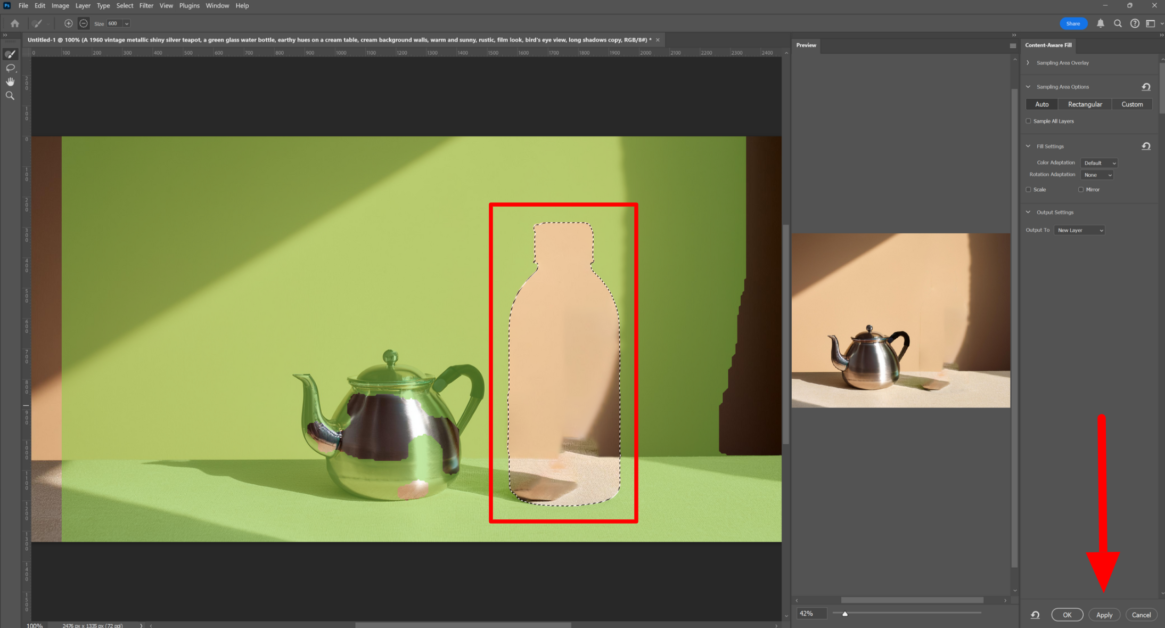
6. Hit Apply when you’re happy with the preview. You’ll notice your selection disappear and be replaced with the background! Hit OK to apply the changes.
Pretty simple, right? It usually is, but sometimes things can get a bit tricky.

As you can see in my photo, a small outline of the bottle is still there. The shadow also no longer makes sense without the bottle there.
That’s nothing a clone stamp can’t fix! Using Content-Aware Fill is still much easier than clone stamping the entire bottle out of the picture.
4 Tips for Seamless Results
Here are some tips I’ve picked up for getting seamless results, especially in complex images:
- Be selective with your sampling area. Sometimes, less is more. Don’t include the sky in your sample if you’re removing something from a grassy area.
- Use the Sampling Brush Options to adjust the size and hardness of your brush. A softer brush can help blend areas more smoothly.
- Don’t be afraid to do multiple passes. Sometimes, removing small parts of an object at a time is better than trying to do it all at once.
- Pay attention to lighting and shadows. The AI is good, but it might miss subtle lighting changes, so you might need to adjust these manually afterward.
The cool thing about the AI in Content-Aware Fill is that it learns and adapts. The more you use it, the better it seems to understand what you’re trying to achieve!
That’s my guide to mastering Content-Aware Fill with AI. It’s a powerful tool that will save you lots of time and headaches!
Just remember, like any tool, it takes practice to really master. Don’t get discouraged if your first attempts aren’t perfect. Keep at it; before you know it, removing objects will feel like second nature!
Enhancing Portraits with Neural Filters
Neural Filters are arguably one of the coolest AI tools in Photoshop. With a few clicks, you can change someone’s expression or age them up!
Neural Filters are not your run-of-the-mill filters. They use machine learning to understand and manipulate the content of your image.
I’ll show you how to use four of my favorite filters:
- Skin Smoothing
- Style Transfer
- Age Variation
- Facial Expression Adjustments
1. Skin Smoothing Filter
Here are some of my favorite Neural Filters.
First up is Skin Smoothing. This one’s a game-changer for portrait retouching. It smooths out skin texture without making it look fake.
Here’s how I use it:
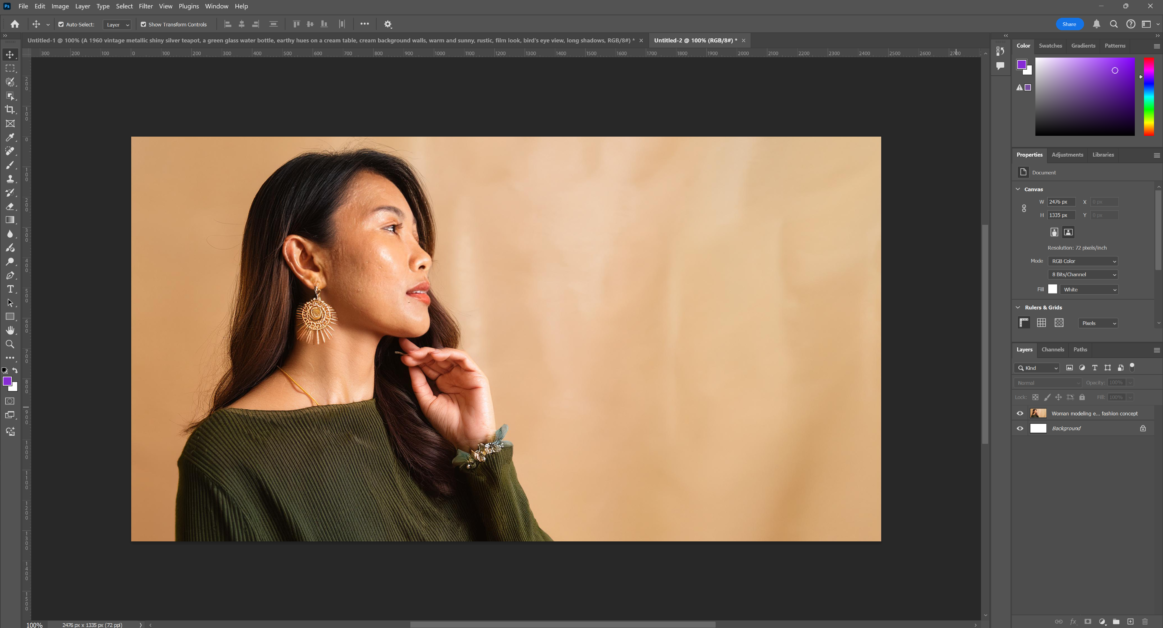
1. Open your portrait in Photoshop. I generated an image of a woman wearing earrings using Photoshop’s new AI image generator.
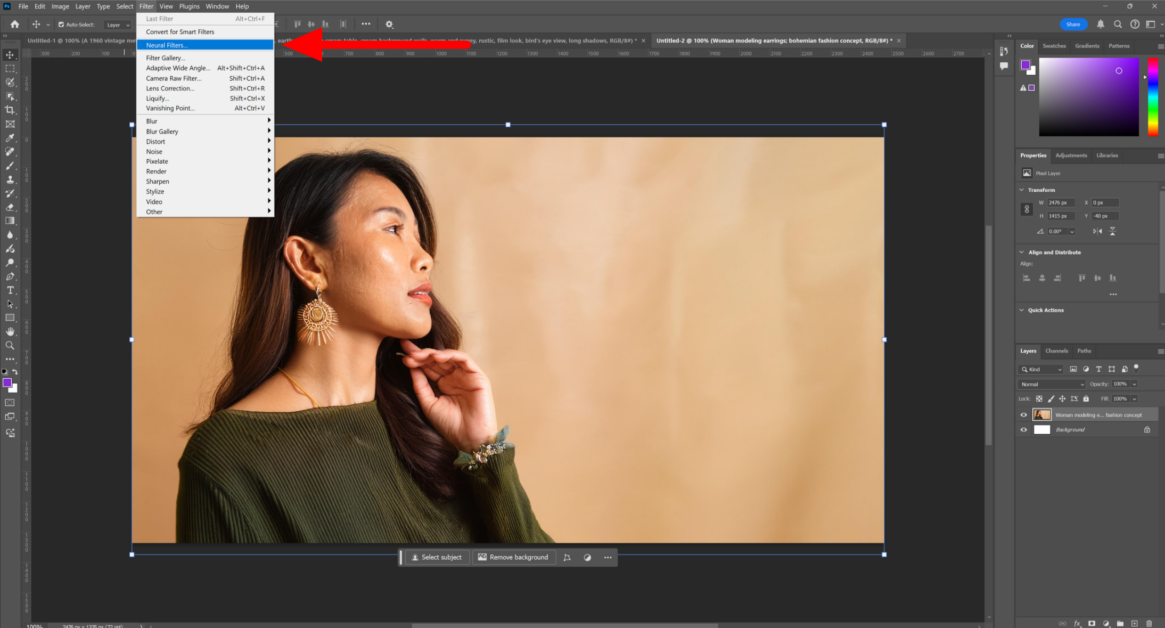
2. With the image selected in the Layers panel, go to Filter > Neural Filters.
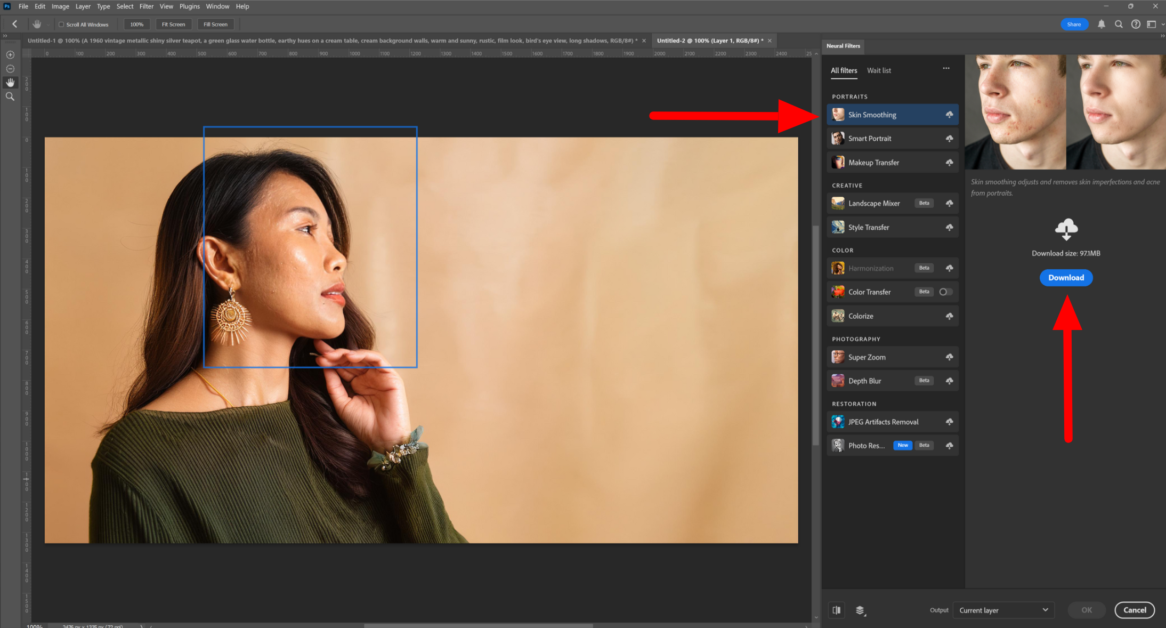
3. Download Skin Smoothing (it only takes a few seconds to download the filter).
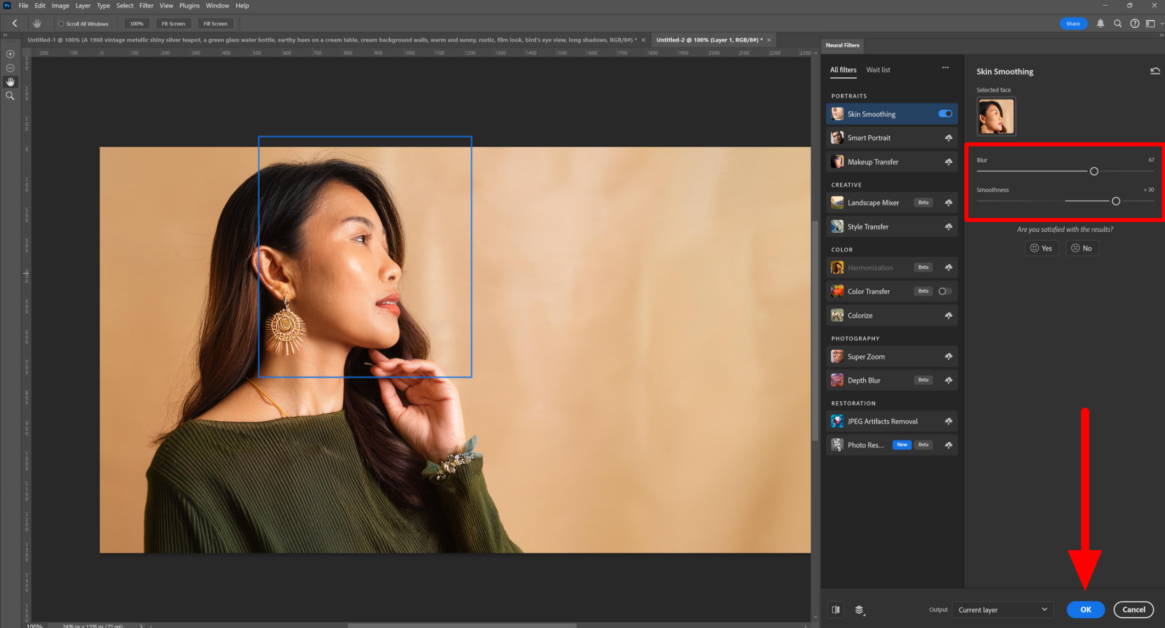
4. Adjust the Blur and Smoothness. Hit OK at the bottom when you’re done.
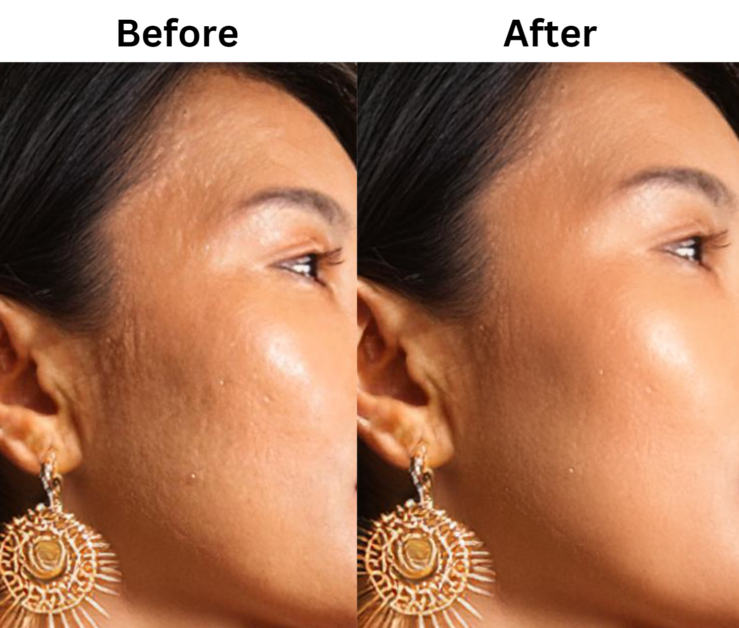
As you can see, the Skin Smoother Neural Filter did an excellent job of naturally smoothing my model’s skin!
2. Style Transfer Filter
Next up is Style Transfer.
This filter is pretty wild. It can make your photo look like it was painted in the style of a famous artist!
Here’s how to use Style Transfer:
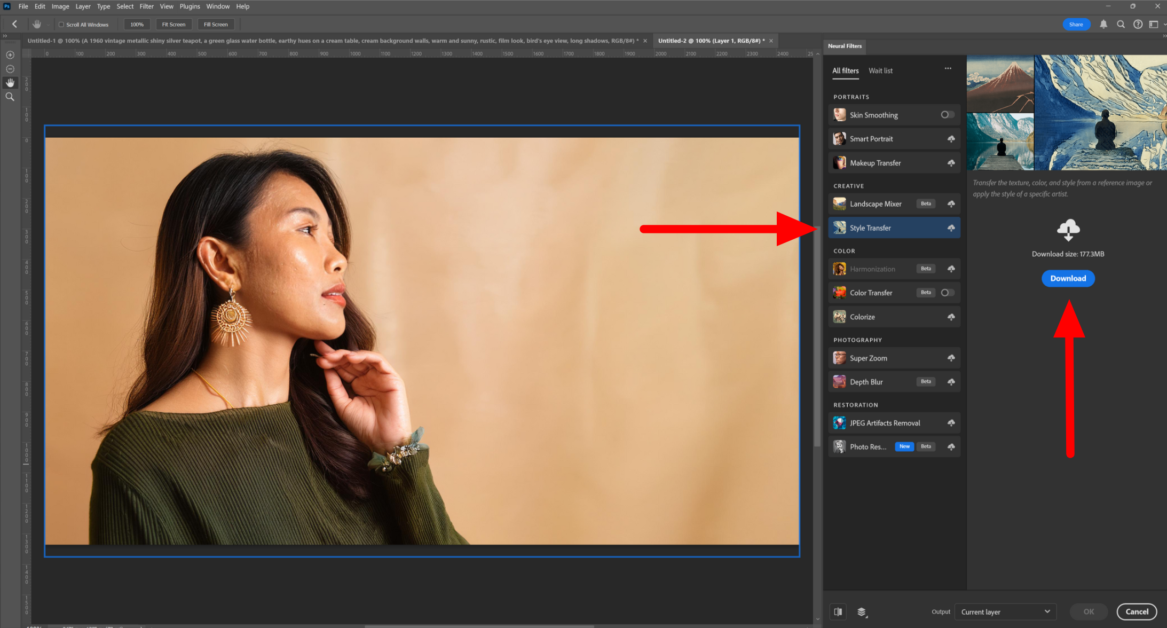
1. In the Neural Filters panel, download Style Transfer. Downloading only takes a few seconds.
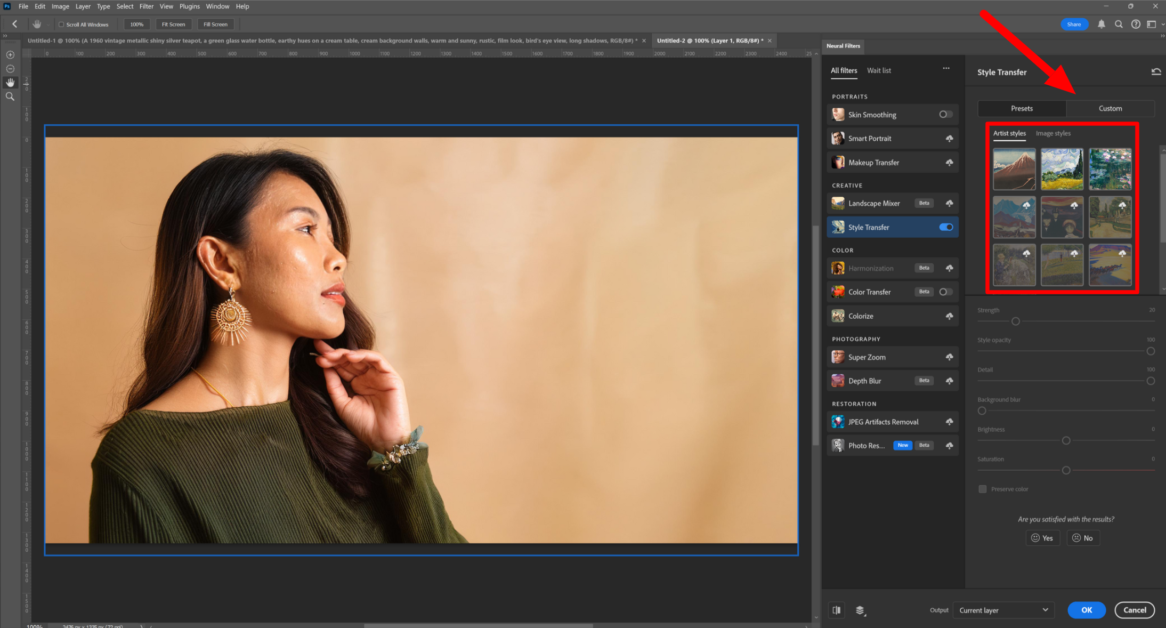
2. Choose a style from the presets or upload your own reference image by going to the Custom tab under Style Transfer in the right panel.
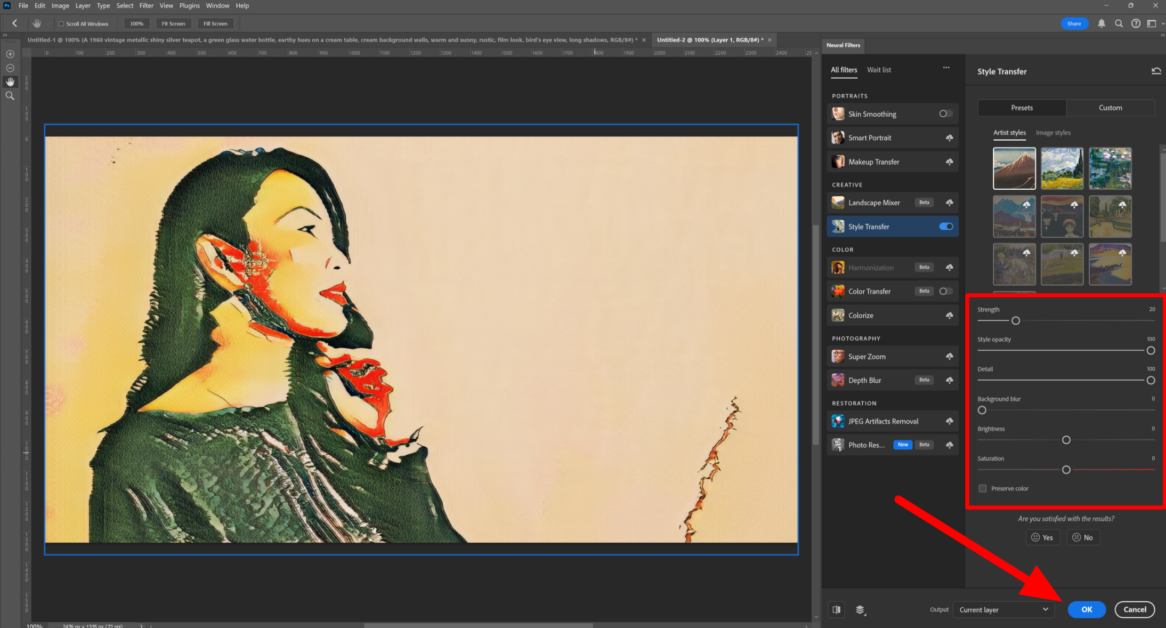
3. Adjust the strength to control how much of the style is applied. Play with the Preserve Color checkbox to keep the original colors or adopt the style’s palette. Experiment with the other controls and hit OK when you’re happy with it.
3. Age Variation Filter
Next, I want to discuss one of the coolest Neural Filters: age variation. This filter lets you see how someone might look younger or older. Pretty mind-blowing!
Here’s how to use it:
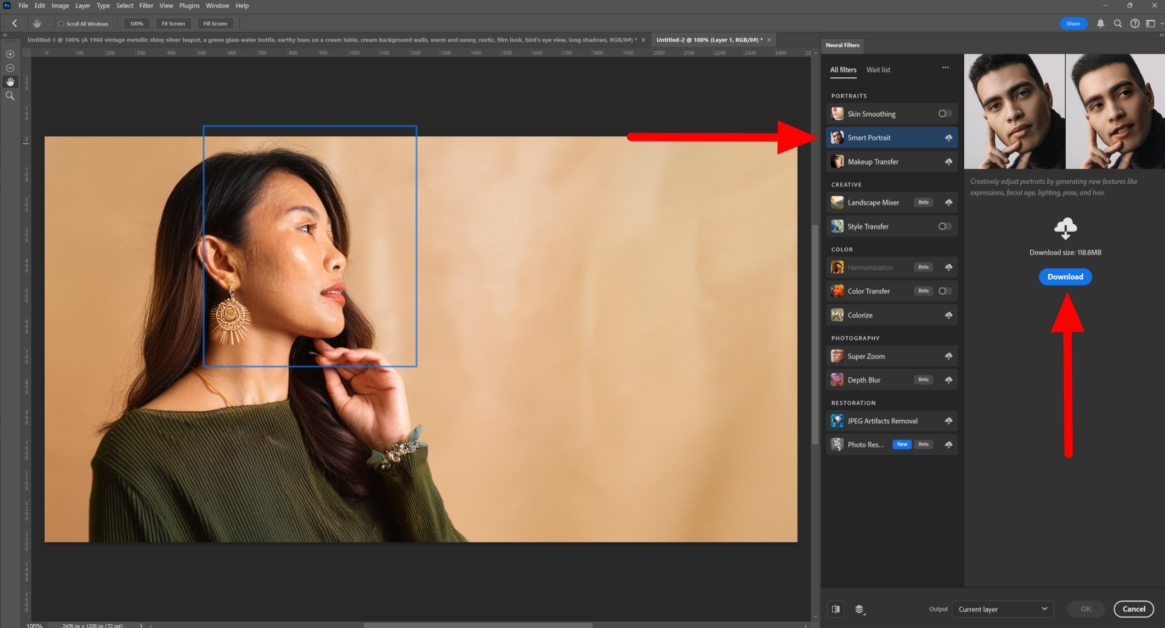
1. In Neural Filters, Download Smart Portrait.
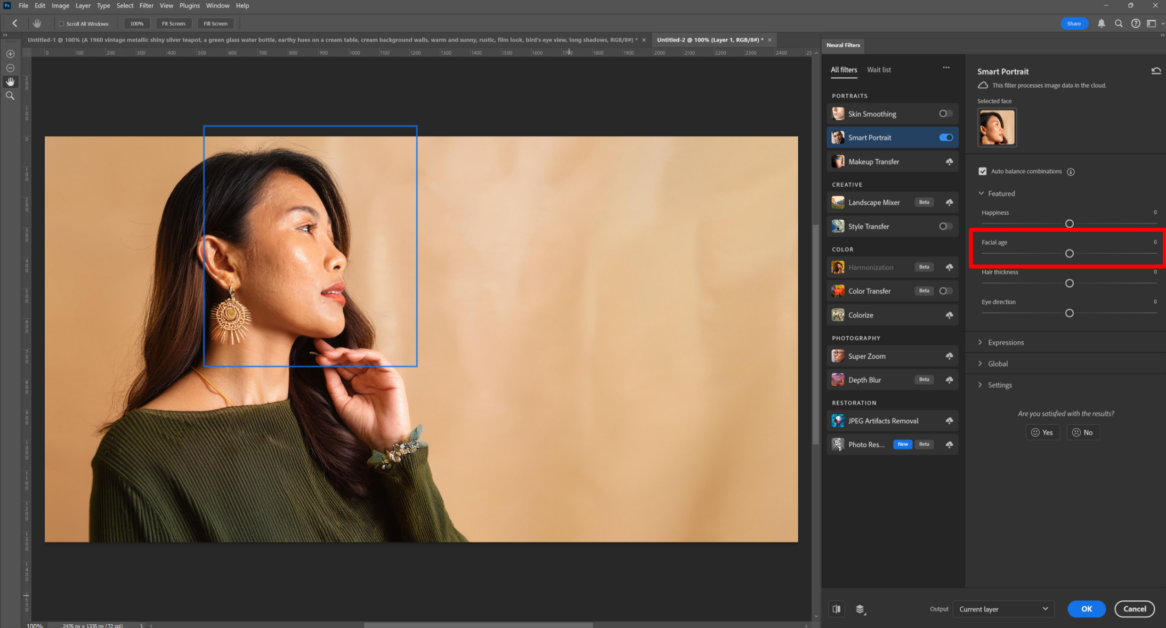
2. Use the slider to adjust the age up or down.
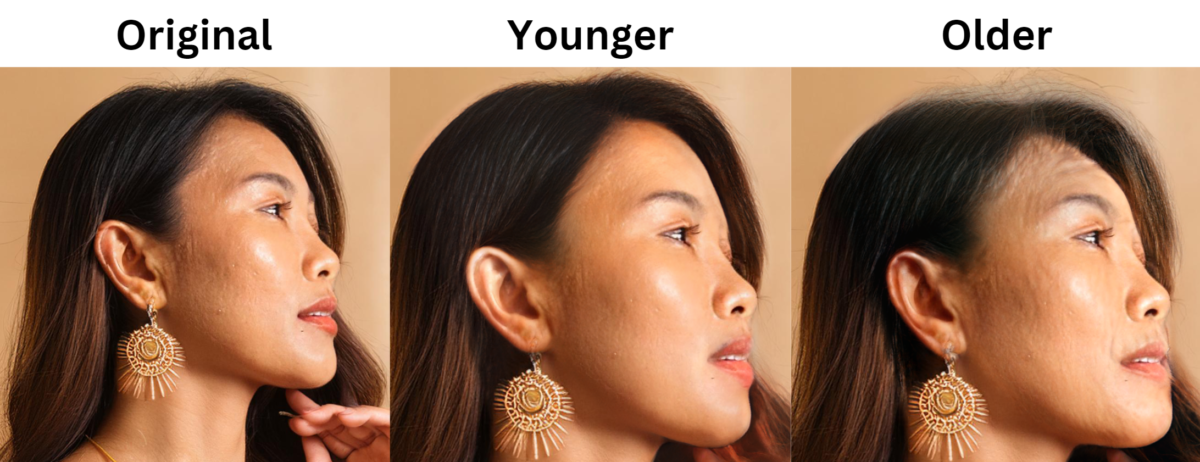
Here’s how the original photo of the model looks compared to the younger and older versions. Notice how the hair color slightly changes and thins when the model’s age is set older. The facial structure also changed depending on where I placed the age toggle.
4. Facial Expression Adjustments
Lastly, I wanted to show you another really cool Neural Filter: facial expression adjustments.
This one’s tricky to get right, but when it works, it’s amazing! You can change someone’s expression from neutral to happy, surprised, or angry.
Here’s how to use it:
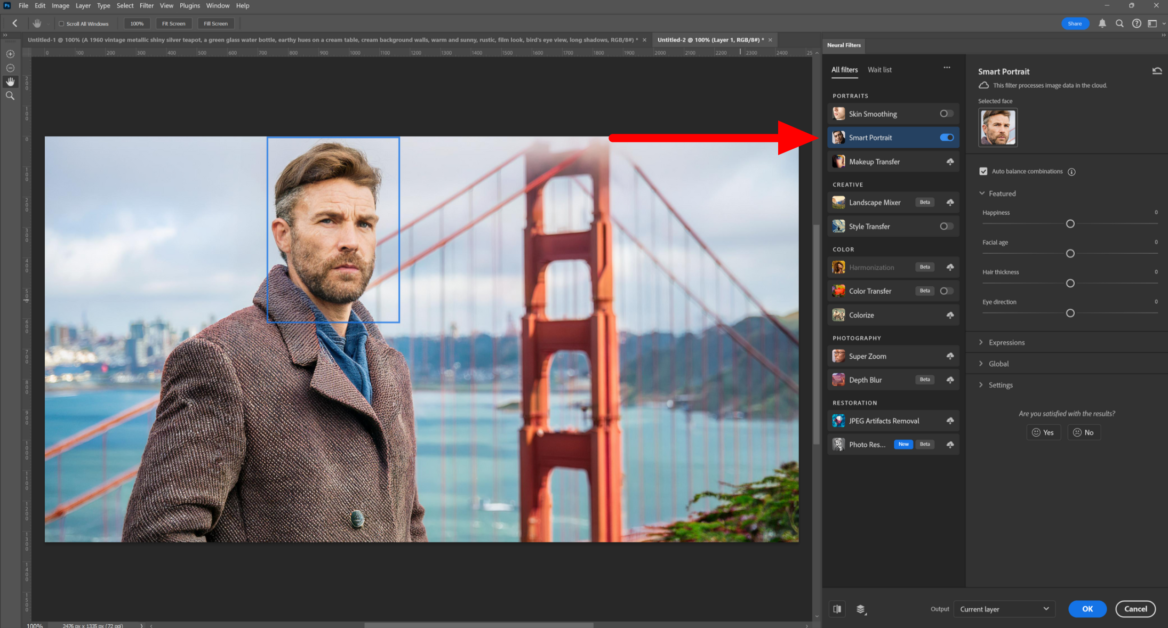
1. Turn on Smart Portrait in Neural Filters. For this filter, I generated a photo of a man looking at the camera with a serious facial expression.
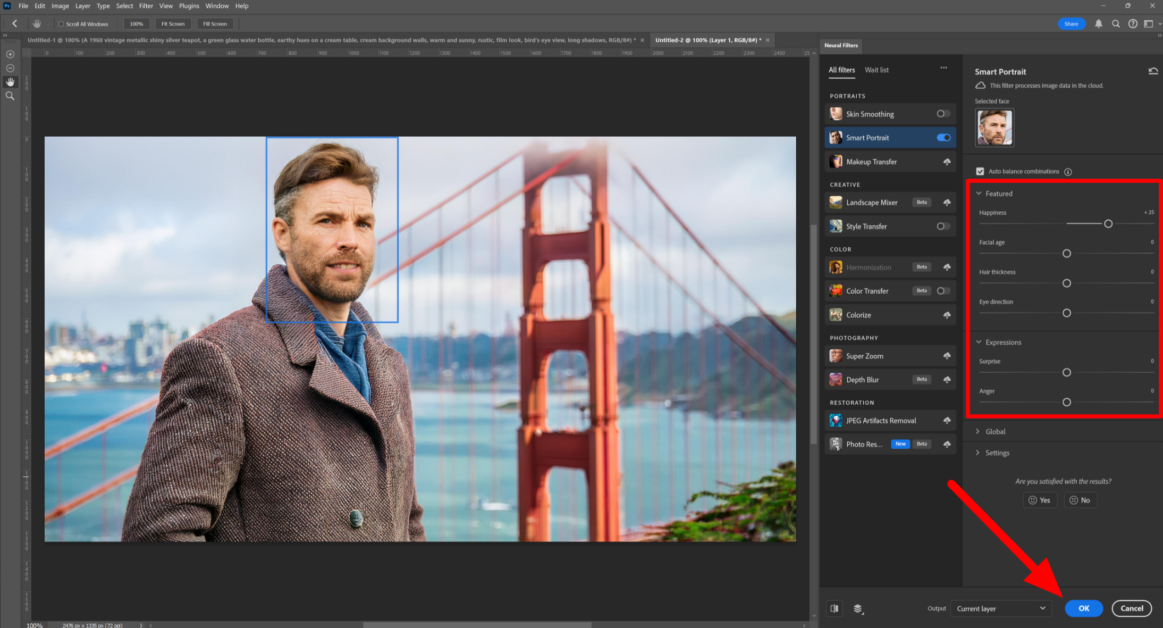
2. In the right panel, choose the expression you want: happy, surprised, or angry. Adjust the strength slider carefully.
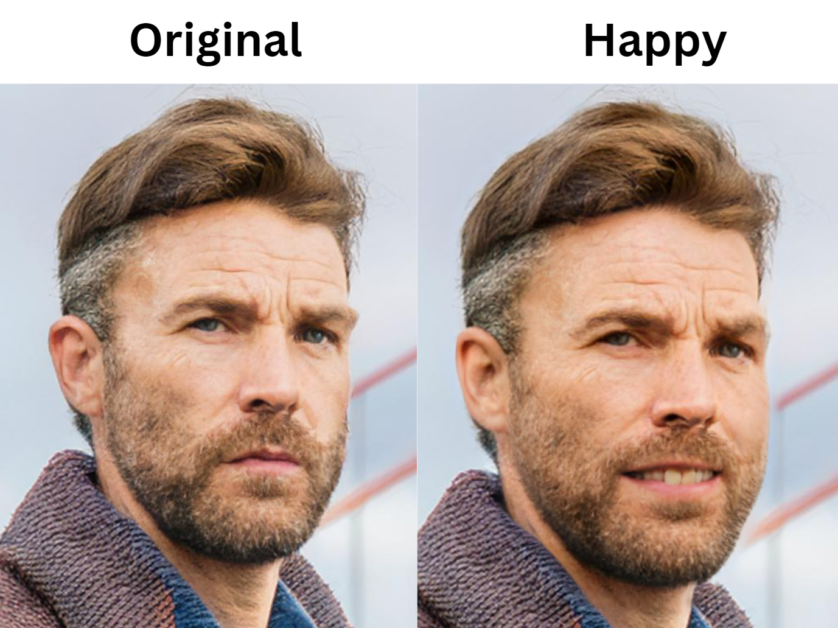
The facial expression adjustment worked perfectly! There are no distortions, and the subject actually looks like he is smiling in the photo.
A word of caution: this can look really unnatural if pushed too far. You’ll also want to make sure your subject is looking at the camera. I tried using this filter on a woman’s side profile, but it didn’t work at all. Her face got completely distorted.
I’ve noticed that all these filters work best on high-quality, well-lit photos. The results can be pretty hit or miss if you’re working with a blurry or poorly lit image.
One of the best things about these filters is that they are non-destructive! The effect creates a new layer, so you can always go back and tweak things if you’re not happy with the result.
Overall, these Neural Filters have really changed the game for me. They’ve sped up my workflow and allowed me to do things I never thought possible in Photoshop.
However, they’re not a magic fix-all. You still need a good eye to use them effectively!
Streamlining Selection & Masking with AI
The AI selection tools in Photoshop have been a massive game-changer for me.
When I took my graphic design course, we spent a good chunk of time trying to master the pen tool. It can be tricky to get a hang of it!
Even after I felt comfortable using it, outlining elements took a lot of time. I’d easily spend hours with the pen tool, painstakingly outlining every detail.
With Photoshop’s AI selection tools? It’s like I have a magic wand that does most of the heavy lifting!
Using Select Subject for Instant Background Removal
Beginning with the Select Subject tool, this thing is great for quick background removals.
Here’s how you use it:
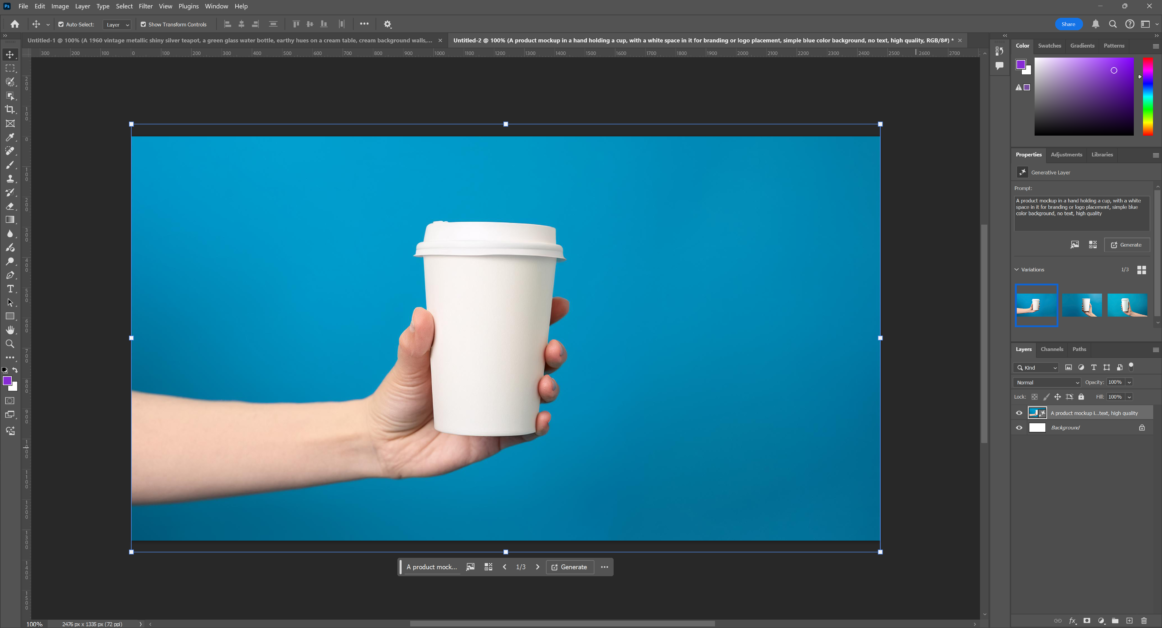
1. Open or generate your image in Photoshop.
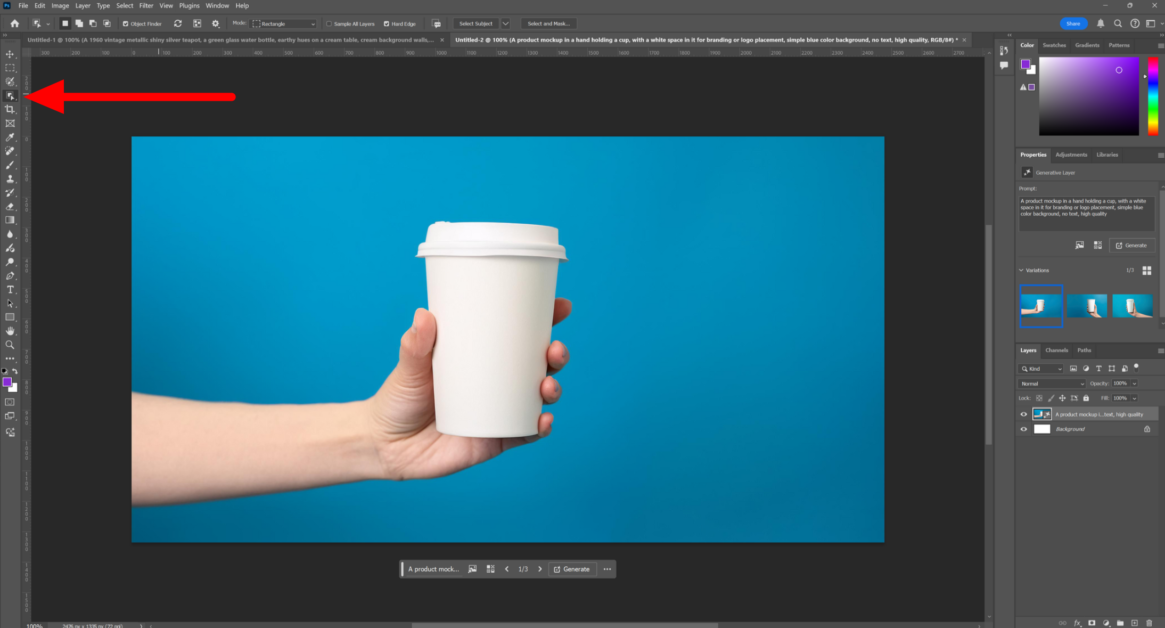
2. Click on the Quick Selection tool in the toolbar.

3. At the top, you’ll see a button that says “Select Subject.” Click it.

4. Photoshop will automatically select the subject.
The Select Subject tool is not always perfect, which was the case for me. Sometimes, it misses bits or includes parts of the background. But even then, it gives you a great starting point you can refine manually with the Modify Selection tool.
Generative Fill
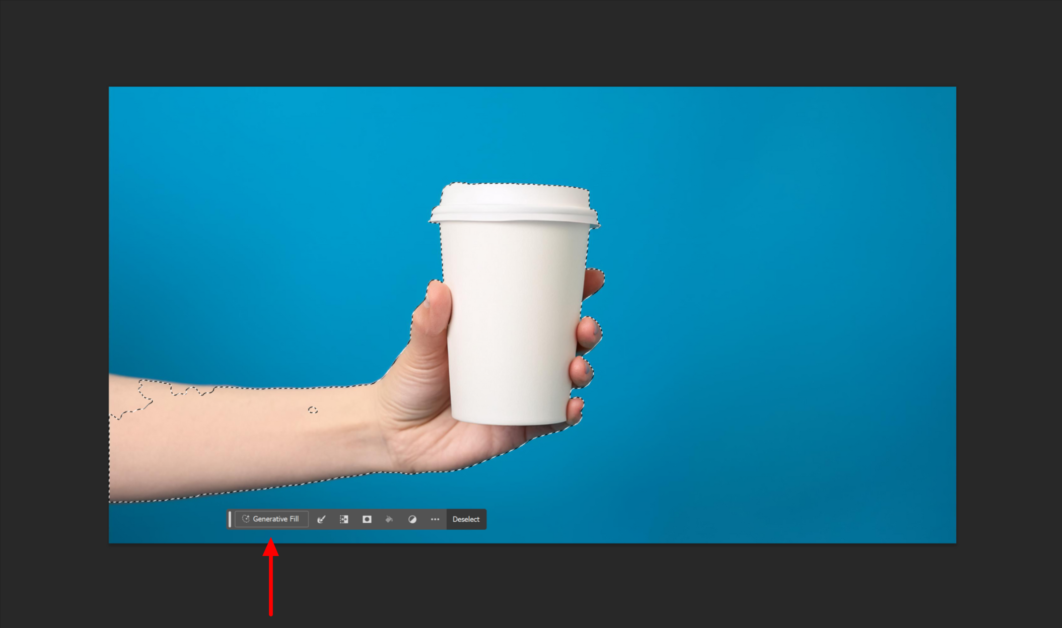
To the left of the brush, you’ll notice a button called “Generative Fill.” When making a selection, use this tool to generate content within the selected area with text prompts!
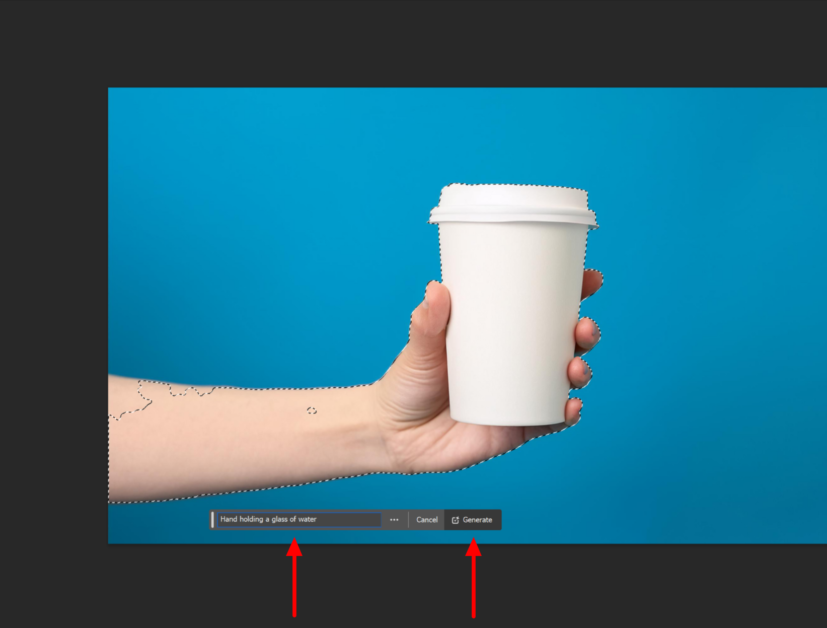
I wanted to replace the coffee cup with a glass of water. After clicking “Generative Fill,” I typed “Hand holding a glass of water” as my text prompt.
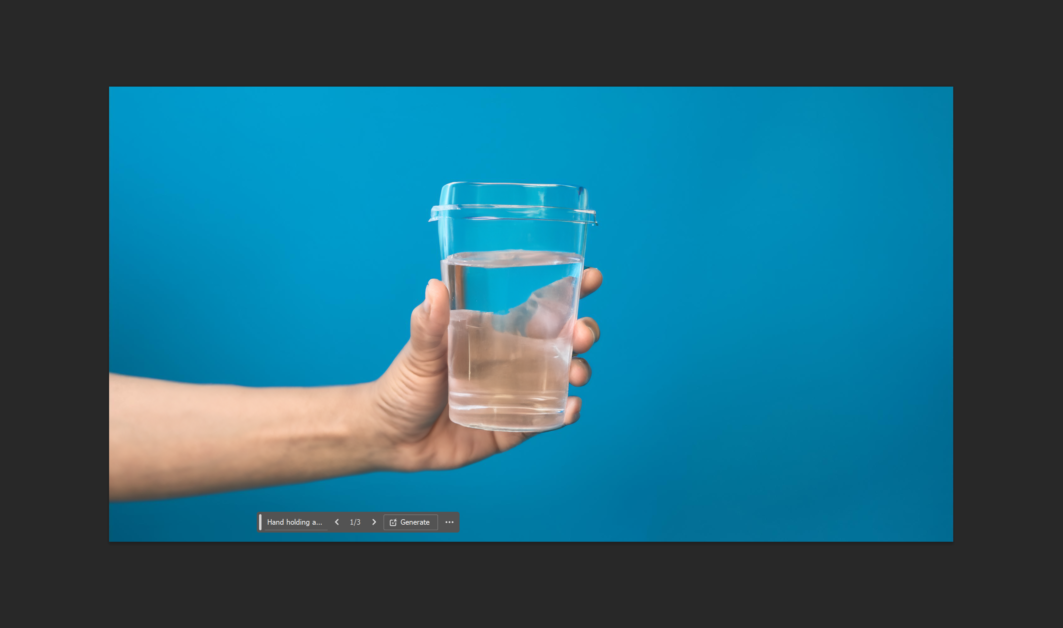
A few seconds later, Photoshop swapped out the coffee cup with a glass of water! The prompt I gave was a bit of a tough one because Photoshop had to generate the hand through the glass of water.
Unsurprisingly, there were some distortions, but that’s nothing some clone stamping can’t fix! Overall, I was impressed with the results.
Refining Hair & Complex Edges with AI Tools
Next, let’s discuss the AI tools for handling tricky edges like hair. The Select and Mask workspace is best for this.
Here’s my workflow for refining hair and complex edges:
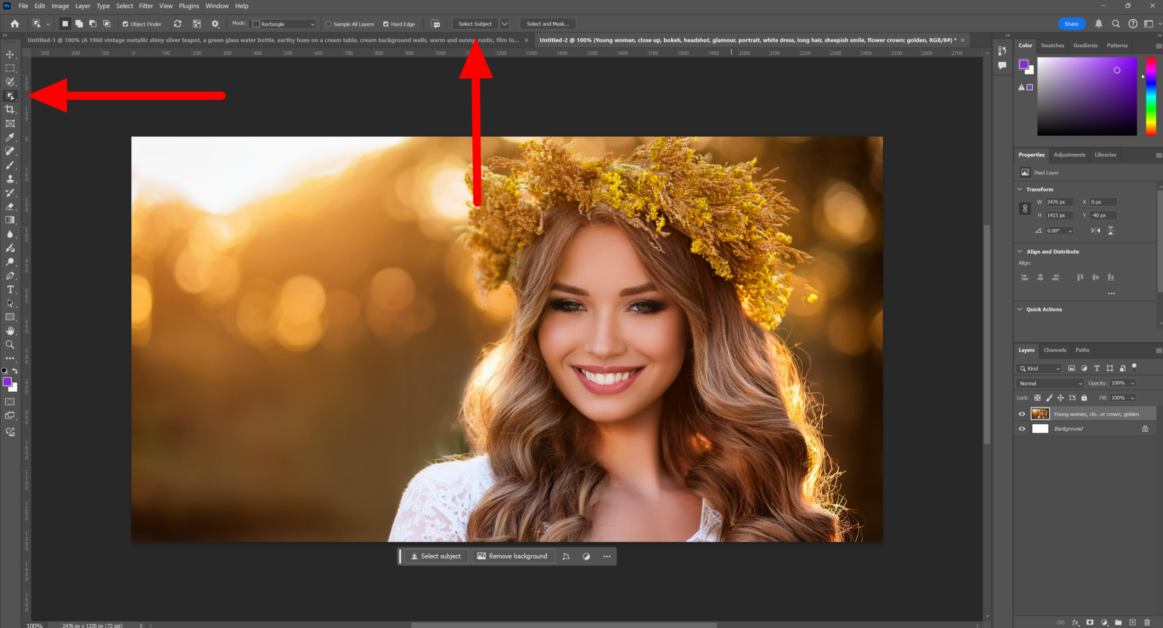
1. Make your initial selection (using Select Subject or any other method).
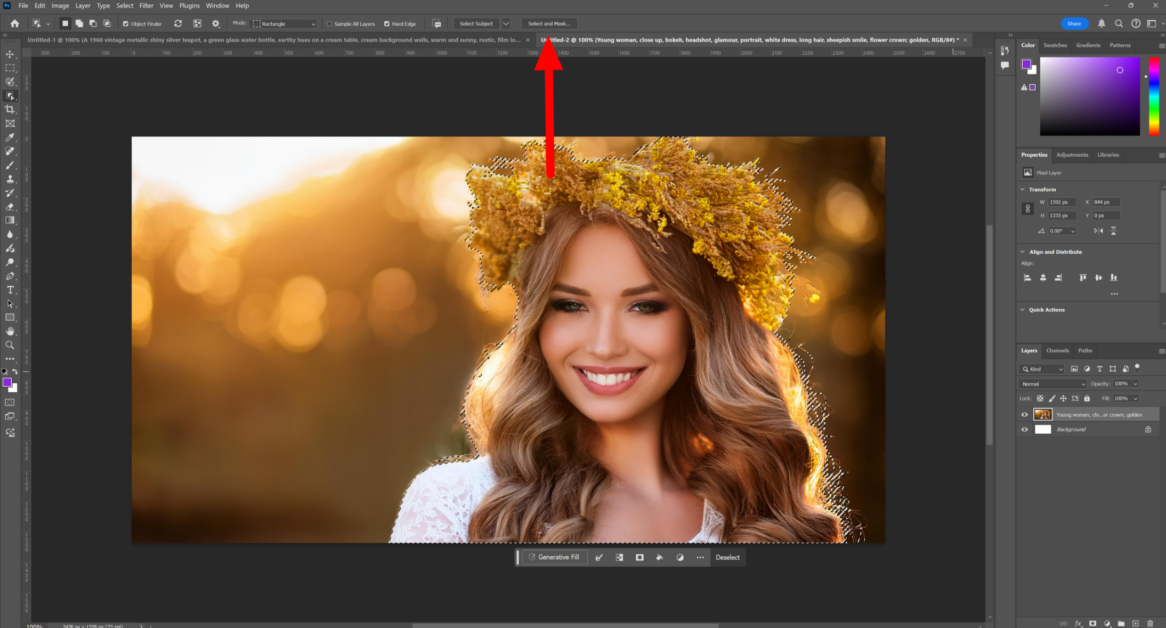
2. Click on Select and Mask in the top toolbar.

3. Use the Refine Edge Brush tool to paint over tricky areas like hair or fur. Change the transparency of the background to help you see the areas you need to brush over better.
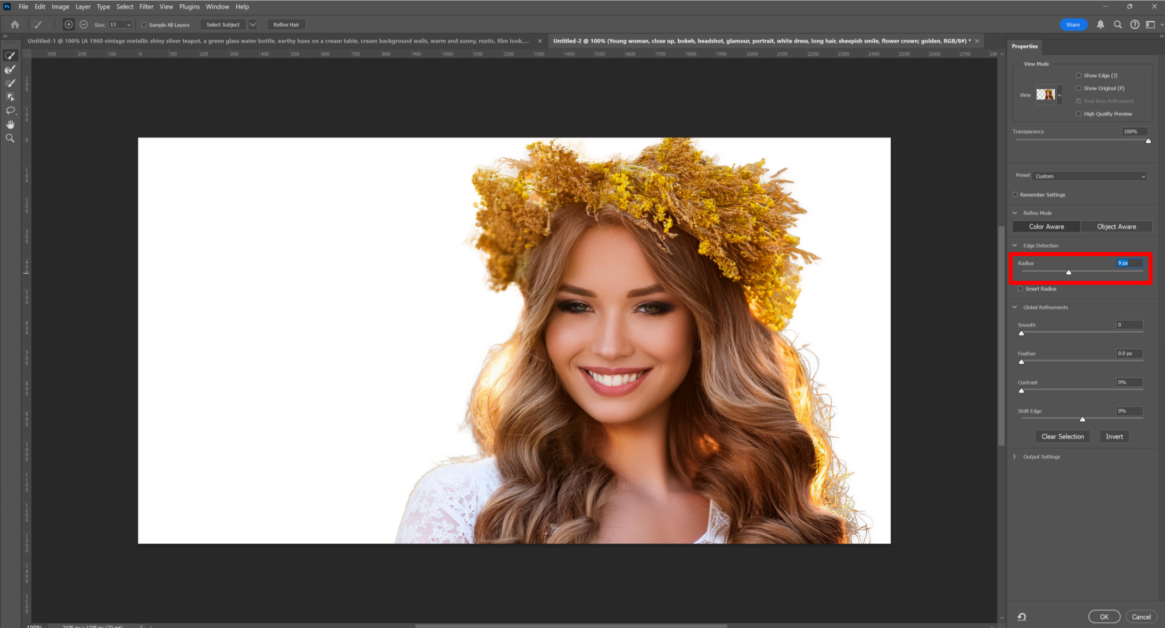
4. Adjust the Smart Radius slider. This tells Photoshop how much to look for edges.
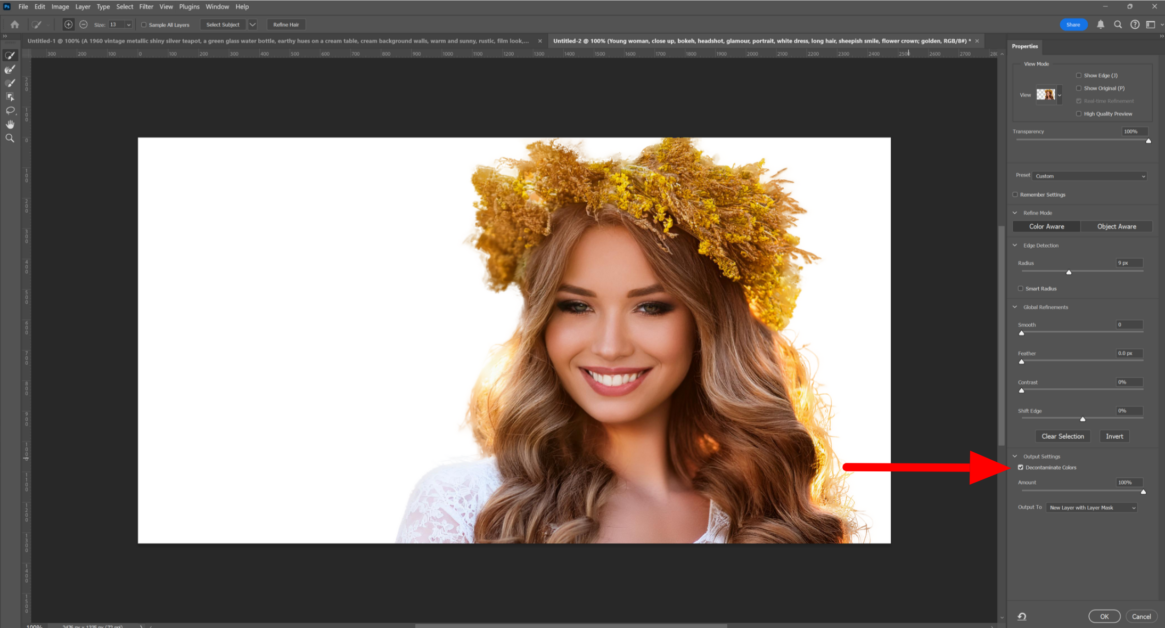
5. Play with the Output settings. Checking off “Decontaminate Colors” really helps with edge halos.
The key here is patience. Don’t try to do it all in one go. Make small, incremental adjustments, and you’ll get there!
Combining AI Selection Tools for Intricate Compositions
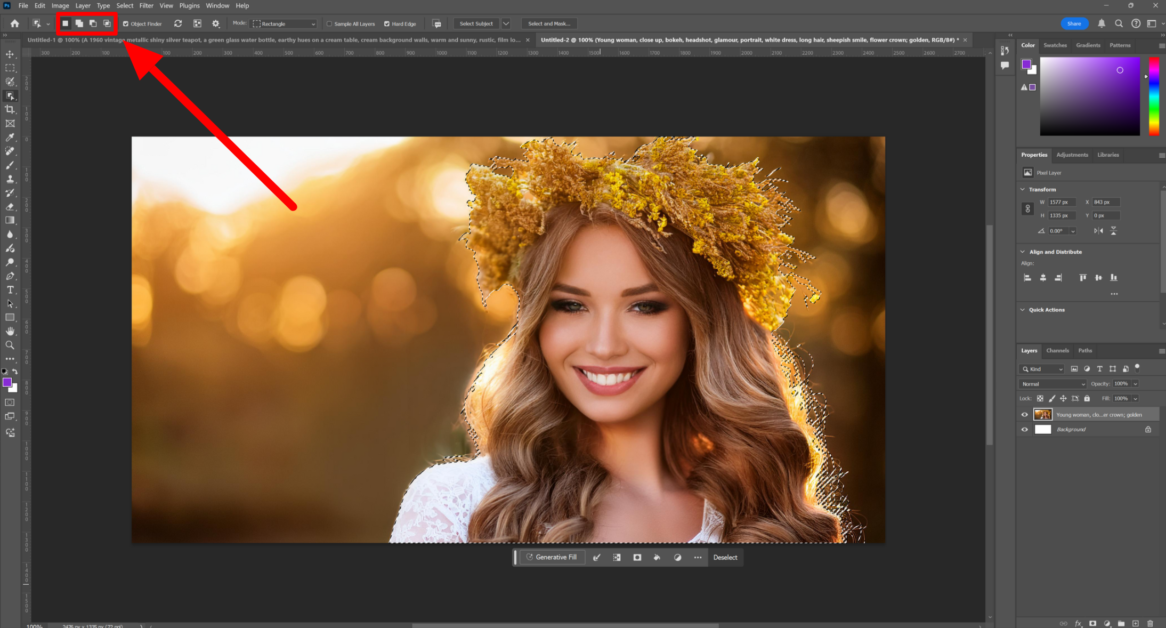
Here’s where things get really cool: combining these AI selection tools for intricate compositions!
Let’s say you’re working on a complex scene with multiple subjects. Instead of selecting everything simultaneously, use Select Subject on each element separately.
Then, you can combine these selections using the Add, Subtract, and Intersect options in the Select menu.
For example, let’s say you’re using Photoshop to design a fantasy book cover. The scene has a warrior, a dragon, and a castle, all on different layers. You can use Select Subject for each element, refine the edges where needed, and combine them into one composition!
Top 3 Tips for Effectively Selecting & Masking with AI
I’ve used these selection tools extensively and learned some things along the way.
Here are my top tips for effectively selecting and masking with AI:
- Don’t forget about the Object Selection tool. It’s like Select Subject, but you can draw a rough box around the object you want to select. It’s great when you have multiple subjects in an image and only want to select one.
- Make sure you check your selection at 100% zoom before you finalize it! The last thing you want is to think that you’ve perfectly removed the background, only to realize later there’s a thin line of the original background left around the entire subject.
- These AI selection tools work best on high-contrast images. If your subject blends into the background too much, try adjusting the levels or curves to increase the contrast before making your selection.
Inevitably, there will still be times when you’ll have to break out the old pen tool for precise work. However, these AI tools will seriously streamline your workflow. What used to take hours now takes minutes, which means you can take on more projects and spend more time on the creative aspects of your work!
Don’t be afraid to embrace these AI selection tools. They’re not here to replace your skills but to enhance them. Play around, experiment, and you’ll be amazed at what you can achieve!
Just remember: the AI is your assistant, not your replacement. Your artistic eye and judgment are still the most important tools in your arsenal!
How Will You Use AI in Photoshop?
There you have it! My top three favorite AI tools in Photoshop. Embracing AI in Photoshop opens up a world of possibilities, allowing you to push the boundaries of your creativity while saving valuable time.
By now, you should know how to:
- Use the Content-Aware Fill tool to fill selected areas of an image.
- Use Neural Filters to smooth skin and change facial expressions.
- Select a subject with a single click, use generative fill to generate content within a selected area, and refine complex edges.
However, the AI-powered features we’ve explored are just the tip of the iceberg. Photoshop offers so many more AI tools to streamline your workflow:
- Upscale images with AI Super Resolution.
- Colorize black and white photos using Neural Filters.
- Create stunning Sky Replacements with the Sky Replacement tool.
- Enhance landscape Photos with the Landscape Mixer.
- Use AI healing tools and Neural Filters for advanced photo restoration.
- Automate your workflows with AI-Driven Actions and Scripts.
As Adobe continues to innovate, we can expect even more exciting AI integrations in the future.
So why not start experimenting with these AI tools today? I know they will enhance your efficiency and bring your artistic vision to life!
Frequently Asked Questions
The post How to Use AI in Photoshop: 3 Mindblowing AI Tools I Love appeared first on Unite.AI.


