As someone who has spent countless hours navigating the complexities of Premiere Pro, I know how overwhelming video editing can be. So, when I came across Veed.io, I was skeptical at first. Could a web-based editor really compare? After trying it for myself, I was impressed with how fast and intuitive it was without sacrificing quality!
Here’s a video I made with Veed.io on the benefits of yoga:
Veed took care of everything: titles, media, AI avatars, voiceovers, background music, and even the subtitles!
Not to mention editing the video, which was a breeze! Veed has AI tools to remove awkward silences and unwanted background noise automatically. I could fine-tune everything in just a few clicks!
Video content is set to account for over 82% of internet traffic by 2025, so finding an affordable editor that speeds up the process while still delivering professional results is key. Veed.io does just that, and here’s why it’s so many people’s go-to for quick, seamless edits!
In this Veed.io review, I’ll discuss the pros and cons, what it is, who it’s best for, and its key features. Then, I’ll show you how I used Veed to create and edit a 30-second video on the benefits of yoga.
I’ll finish the article by comparing Veed with my top three alternatives (Pictory, Synthesys, and Deepbrain AI). By the end, you’ll know if Veed is right for you!
Verdict
Overall, Veed is a powerful and user-friendly tool for creating various types of content. Its intuitive drag-and-drop interface, robust AI features, and seamless collaboration make it ideal for this type of content. However, it lacks some advanced features for more complex editing. Plus, its free version is quite limiting, especially if you’re working with larger video files or require professional editing capabilities.
Pros and Cons
- An intuitive, drag-and-drop interface that’s easy for beginners to navigate.
- It offers many features, from basic cuts and transitions to advanced options like subtitles, filters, and screen recording.
- Numerous AI tools, including Magic Cut, AI Translate, Auto Subtitles, Text to Speech, AI Voice Cloning, and Eye Contact Correction.
- Access your projects from any device with Internet access.
- Processes videos quickly for efficient editing.
- Access over 2 million royalty-free video and audio assets.
- Seamless teamwork with smart collaboration tools.
- Suitable for various use cases, including social media content, marketing campaigns, educational videos, and more.
- Veed.io is constantly evolving and adding new features based on user feedback.
- Lacks some advanced functionalities found in more specialized video editing software.
- Being web-based, it relies on a stable internet connection.
- There may be slow upload speeds and buffering, especially with larger video files.
- The AI-generated avatars may appear unnatural or overly expressive.
- There may be occasional glitches when uploading videos.
- The free version is very limiting.
What is Veed.io?
Veed.io is an online video editing platform that simplifies the video creation process for beginners and professionals. It offers many features to help content creators produce high-quality videos efficiently, making it particularly popular among social media influencers, marketers, and businesses!
Veed.io is like having a simplified video editing studio right in your browser. There’s no need to download hefty software or worry about your computer fan sounding like it’s about to take off. It’s all cloud-based, which means you can access your projects anywhere with an internet connection. It’s great for when you’re on the go and need to make quick edits!
History & Background of Veed.io
Veed.io wasn’t always the slick platform it is today. It started as a humble startup back in 2018.
The founders, Sabba Keynejad and Timur Mamedov, were just two guys who saw a need for an easier way to edit videos online. They bootstrapped the whole thing, which is pretty impressive when you think about it! They had a great idea and followed through with it.
There’s actually an interview with Sabba in which he talks about how they initially struggled to get funding. Investors told him the video editing market was too saturated. But Sabba and Timur stuck to their guns, believing there was room for a more user-friendly option.
They were right, and Veed grew significantly! It did particularly well during the pandemic when more people were trying to create video content from home, and it continues to grow.
Who is Veed.io Best For?
Veed.io is a versatile online video editing platform that caters to a wide range of users. Here’s a breakdown of who it is best suited for:
- Content creators like social media influencers can use Veed to create engaging videos for platforms like YouTube, TikTok, and Instagram. Its user-friendly interface and features like auto subtitles and text-to-speech make it easy to produce high-quality content quickly. Vloggers can use Veed.io to effortlessly add effects, music, and transitions to their vlogs!
- Marketers can use Veed to create promotional videos, advertisements, and marketing campaigns. The platform’s stock library and customizable templates help maintain brand consistency.
- Businesses and corporations can use Veed to produce internal videos, training materials, and presentations.
- Educators like teachers and trainers can use Veed to create instructional videos and educational content. Features like screen recording and annotations come particularly in handy for enhancing the learning experience!
- Podcasters can use Veed to easily record, edit, and create shareable clips from podcast episodes.
- Event Planners can use Veed to compile event footage into highlight reels or promotional content.
- Startups and entrepreneurs can use Veed to create professional-looking videos without extensive technical skills or expensive equipment.
Veed.io is best for individuals and teams seeking to create high-quality video content without technical expertise. Its ease of use, AI-powered features, and cloud-based accessibility make it a solid choice for easily creating a wide range of videos.
Veed.io Key Features
Veed.io’s features make it a solid choice for most video editing tasks, striking a balance between functionality and ease of use.
User Interface & Ease of Use
Veed’s user interface is incredibly intuitive. No more fumbling around with complicated editing software to complete simple tasks!
With Veed.io, it’s all drag-and-drop. The layout is clean, and everything’s where you’d expect it to be.
Video Editing Capabilities (Trimming, Cutting, Transitions)
Veed has plenty of video editing capabilities. It covers all the basics: trimming, cutting, transitions, etc.
Veed is particularly useful for creating highlight reels. For example, cutting a 30-minute video down to a 2-minute highlight reel is a breeze!
The trimming tool is precise, making it easy to nail those perfect cuts. And the transitions have plenty of options that’ll make your videos engaging without being over-the-top!
Video Recording & Audio Editing Options
Many online editors lack decent audio editing options. But Veed.io has some pretty solid tools in this department!
You can adjust volume levels, add background music, and even remove background noise. For example, you don’t have to worry about wind noise while shooting content outside. Veed.io’s audio tools help salvage what you might think is a lost cause!
In addition to audio editing, you can record your screen or webcam directly within the platform. This is excellent for tutorials and presentations!
Text & Subtitle Tools
Veed.io stands out in the text and subtitle tools. Their auto-transcription feature is a huge game-changer!
It’s not always perfect and might make spelling mistakes, but it’s a great starting point and saves lots of time. I used Veed to generate subtitles for my video, and there wasn’t a single spelling mistake.
Veed also comes with plenty of fonts and styles to choose from. It’s easy to get sucked into spending way too much time playing around with the text animations.
AI-Powered Tools
And let’s not forget Veed’s AI-powered tools to streamline your workflow!
- Magic Cut automatically removes silences and irrelevant parts from your videos. No need to manually sift through footage!
- The AI Voice Cloning and Text-to-Speech tools let you create voiceovers with AI-generated voices, perfect for narrations or dubbing.
- The Auto Subtitle Generator quickly adds subtitles, enhancing video accessibility with minimal effort.
- Choose from over 50 avatars to create engaging videos with AI-generated presenters, adding a professional touch to your content.
Stock Media Library & Brand Kits
Veed.io has a really useful stock media library with over 2 million royalty-free video and audio assets. If you ever need a quick transition shot or some background music, it’s right there in the library! The selection isn’t as vast as some dedicated stock sites, but it’s sufficient for most projects.
Another helpful feature is the brand kits. The brand kit creation feature on Veed helps maintain consistency across your videos with logos and templates!
Collaboration Features
Veed’s collaboration features are for you if you work with a team.
With Veed, you can easily share and work on projects together seamlessly to get more done faster. These collaboration tools are especially useful if you’re on a time crunch and need to get your team together to simultaneously jump in on the same project.
Export Options & Supported Formats
When it comes to exporting, Veed.io offers plenty of options. You can adjust the quality, choose from different aspect ratios, and export in various formats. I’ve never had compatibility issues, whether I’m uploading to YouTube or Instagram or sending files directly to clients.
I also love the fact that with Veed, I can publish videos directly from the platform using an embeddable player. The embeddable player makes it easy to share across various channels!
How to Use Veed.io
Here’s how I used Veed.io to create and edit a 30-second video on the benefits of yoga:
- Create a Veed Account
- Choose a Plan
- Familiarize Yourself with the Editor
- Change the Background
- Add an AI Avatar
- Give the Avatar a Script
- Reposition Your AI Avatar
- Add a Title
- Add Media
- Add Subtitles
- Add Background Music
- Export Your Video!
Step 1: Create a Veed Account
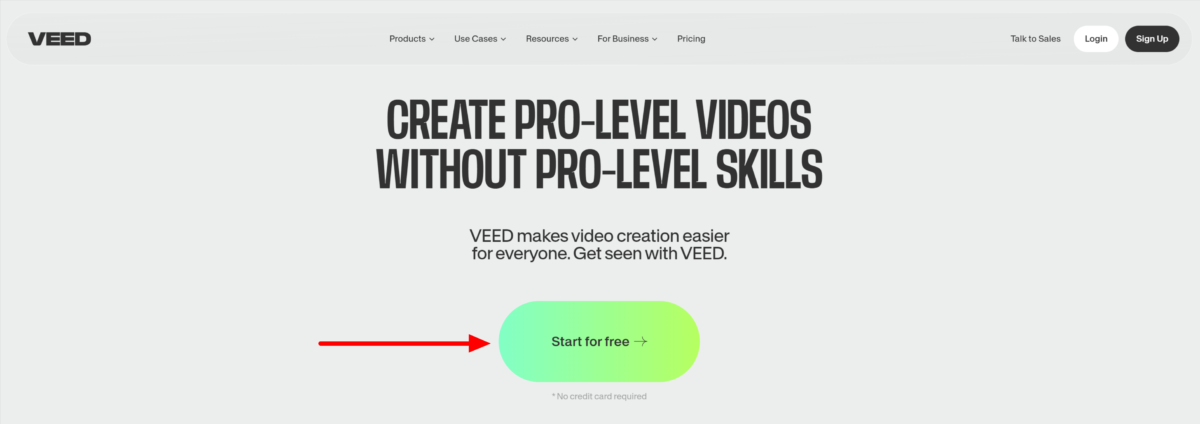
First, you’ll need to create an account. I did this by heading to veed.io and clicking the big “Started for free” button.
Step 2: Choose a Plan
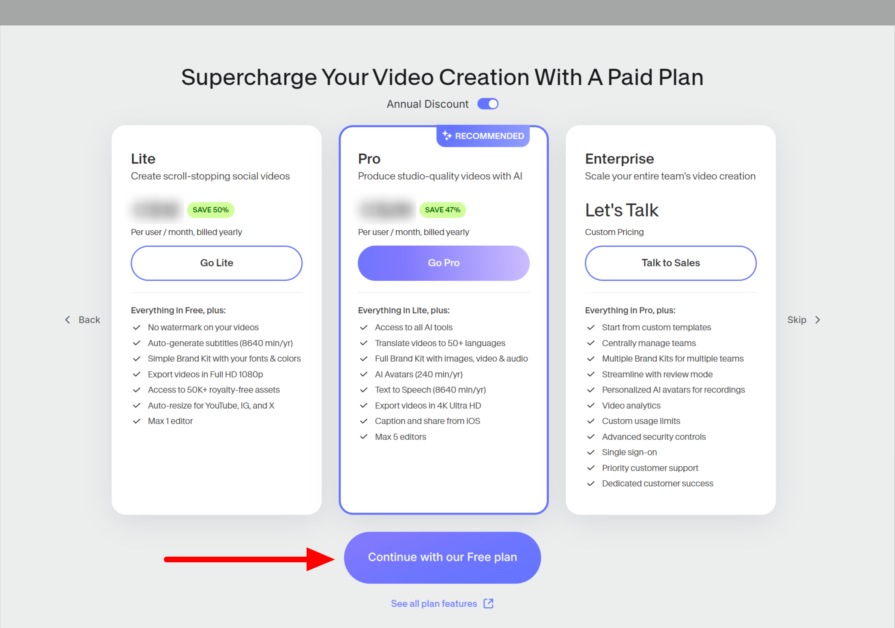
After creating an account and answering some questions, Veed asked me which plan I wanted to subscribe to. They’ve got different plans, but I recommend starting with the free version to get a feel for it.
I selected “Continue with our Free plan.”
Step 3: Familiarize Yourself with the Editor
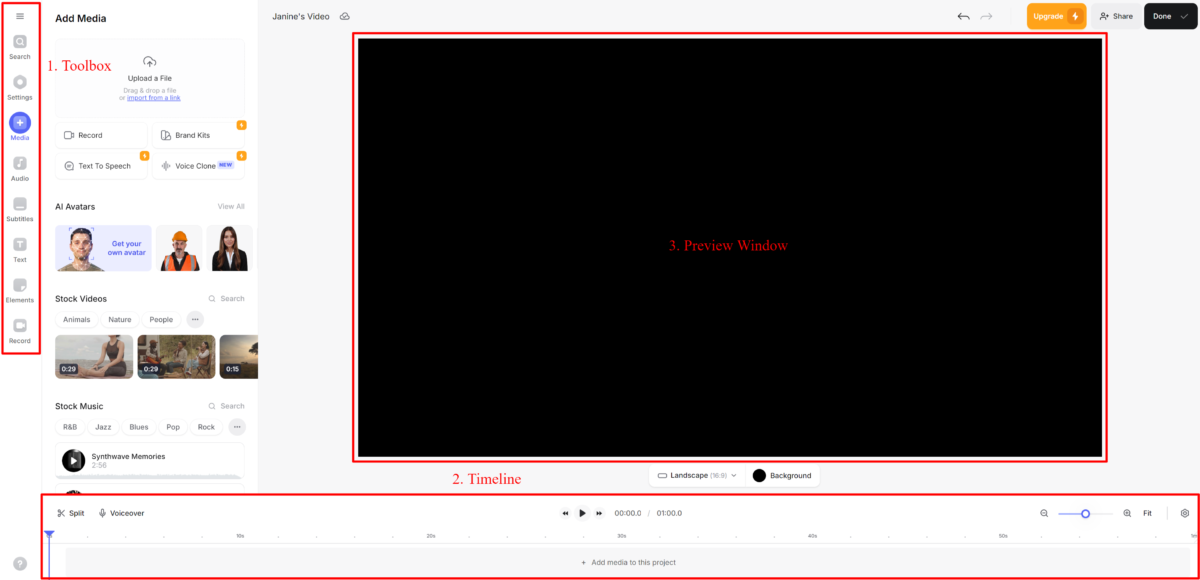
Once you’ve selected your plan, Veed will immediately take you to their video editor! You can upload your own video or start from scratch within the editor. I decided to use the assets within Veed to create a video on “The Benefits of Yoga” rather than uploading my own media.
The interface might initially look daunting, but don’t freak out! It’s actually pretty intuitive once you start poking around:
- On the left is your toolbox with all the editing options.
- The timeline is at the bottom.
- Your preview window is front and center.
Everything is organized in a way that makes sense, which I appreciate.
Step 4: Change the Background
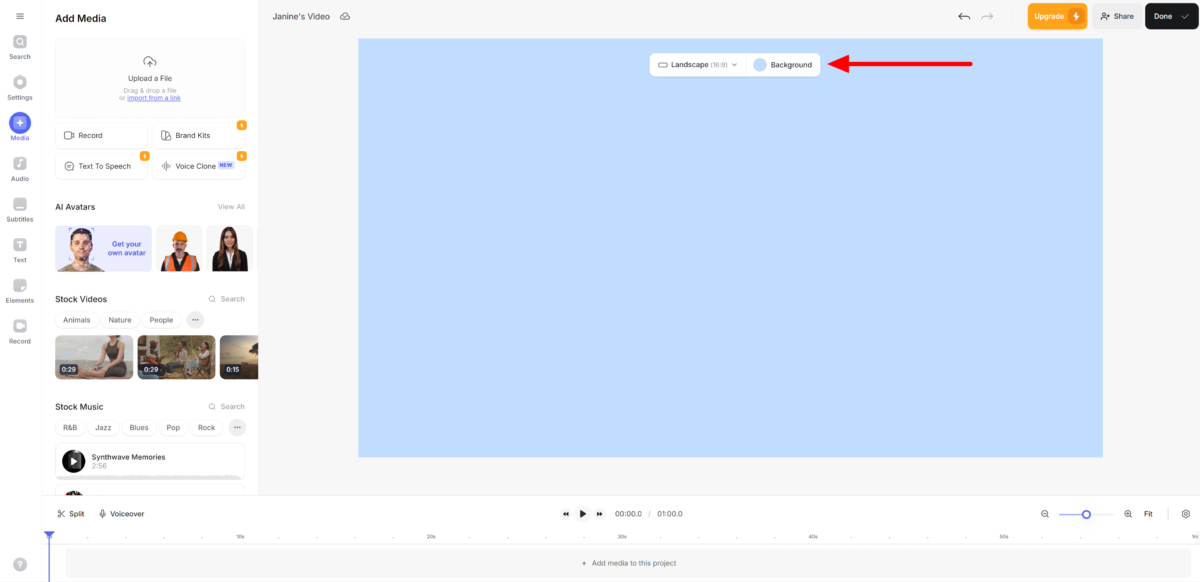
I wanted to start with a plain background, a title, and an AI avatar introducing the video.
I started by selecting “Background” near the preview window. I chose a calm blue color that I felt matched my yoga theme.
Step 5: Add an AI Avatar
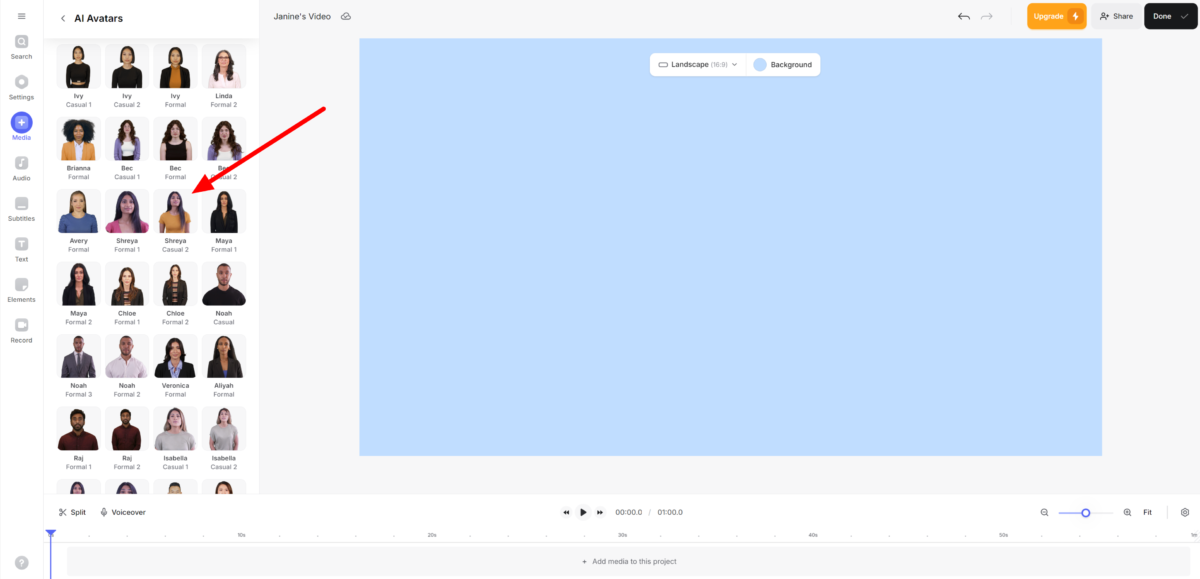
In the same panel, I chose an AI avatar. There were lots of avatars to choose from!
Step 6: Give the Avatar a Script
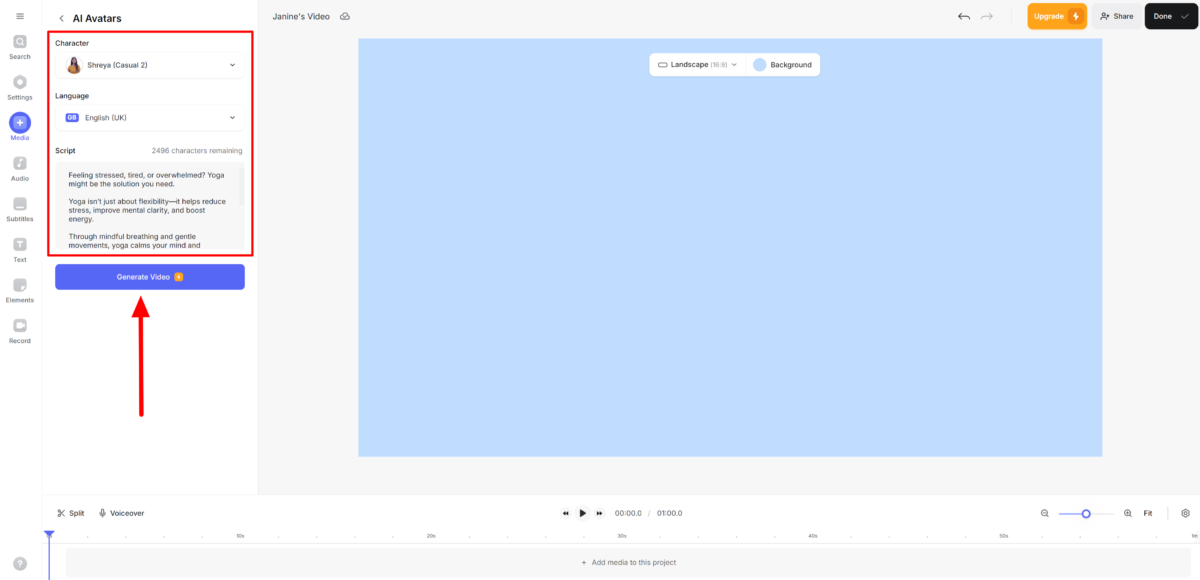
I also selected my avatar’s language and added a script.
Once I was happy with everything, I hit “Generate Video.”
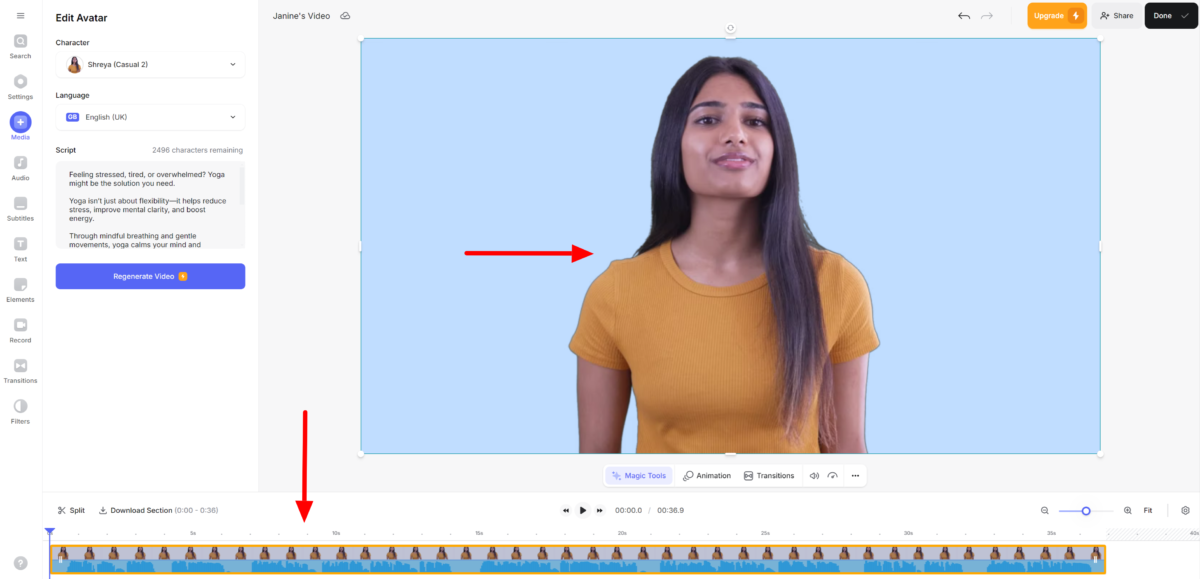
After a few minutes, Veed generated a video of my AI avatar saying the script! It was automatically added to the timeline, and the video of my avatar appeared in the preview window.
I was pretty impressed with how accurate the lip-syncing was, and the voice matched the avatar well.
Step 7: Reposition Your AI Avatar
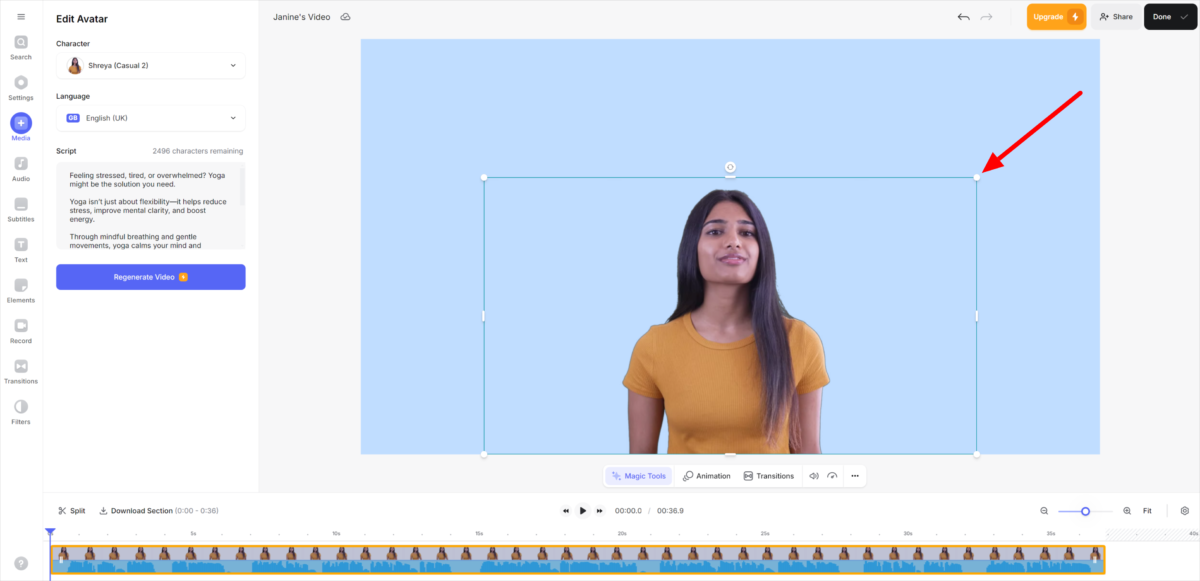
I repositioned my avatar by clicking and dragging on her and adjusting her size by clicking and dragging on the corners.
Step 8: Add a Title
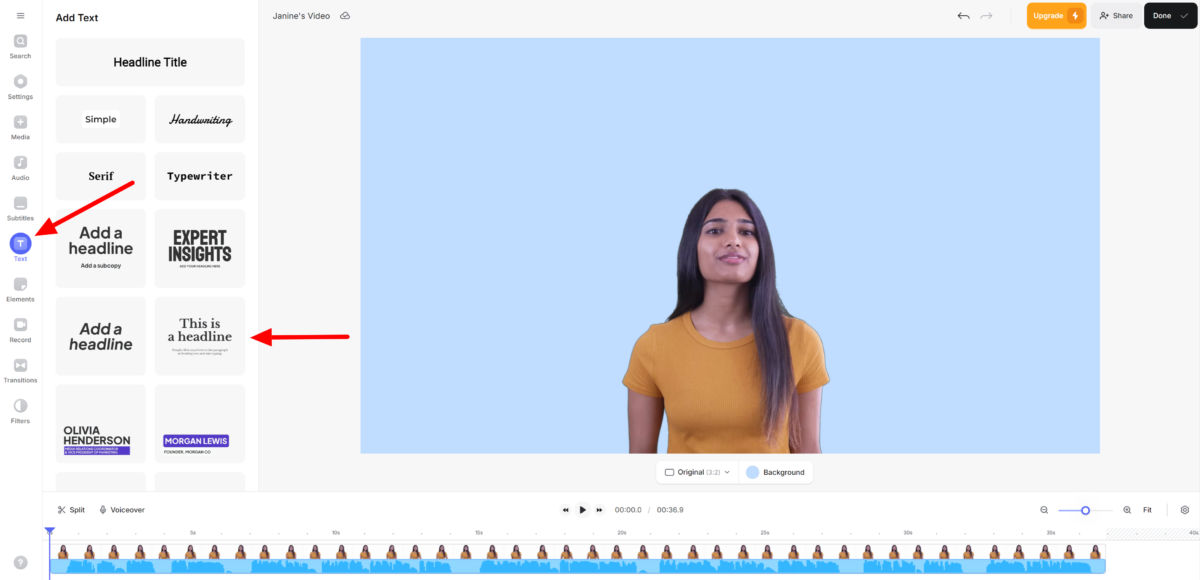
Next, I wanted to add a title. I selected “Text” from the toolbar and selected a serif headline title.
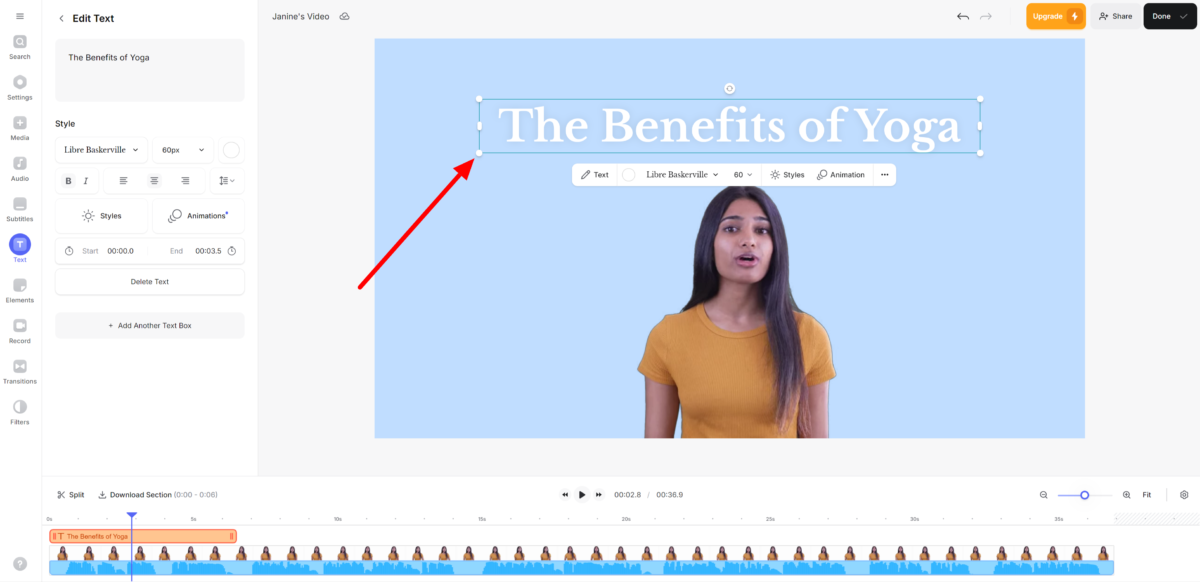
The title appeared in the preview window, and I could adjust it exactly as I wanted, just like the avatar.
Step 9: Add Media
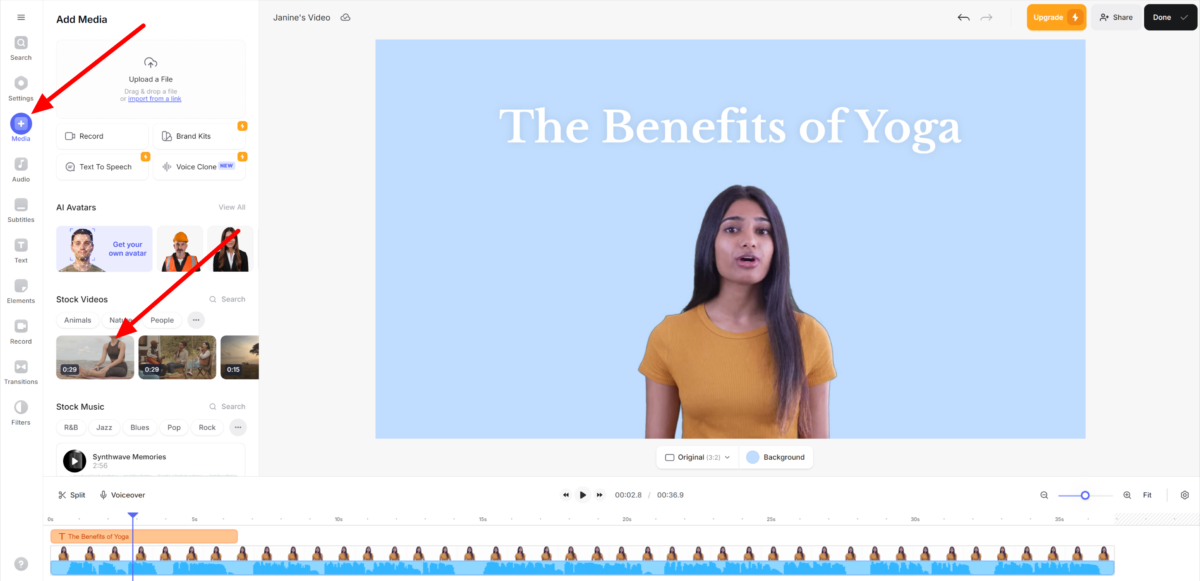
From here, I wanted to add a background video of someone doing yoga. I selected “Media” and added a yoga video to my timeline.

I made a few edits in the timeline, splitting and arranging my clips.
To split, I selected the video and placed the cursor where I wanted to cut. You can hit the “Split” button or “S” on your keyboard. I dragged the handles on either end of the clip to trim the video. I also arranged the clips by clicking and dragging them where I wanted on the timeline.
Step 10: Add Subtitles
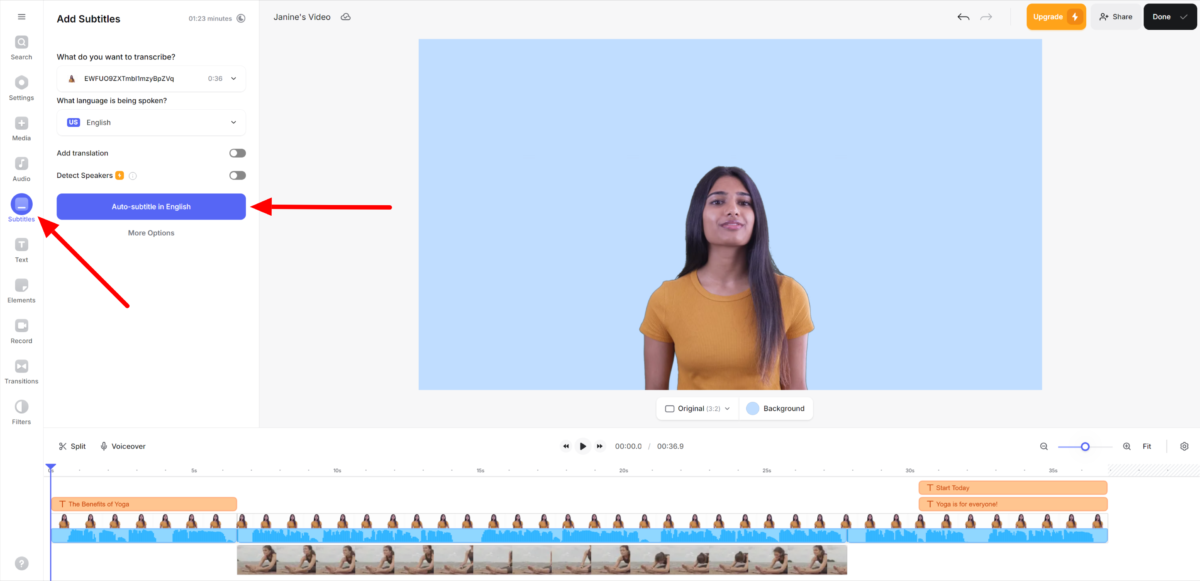
Next, I wanted to add subtitles to make sure the video was accessible to a wider audience. Veed automatically generates subtitles, so you don’t have to worry about adding them manually!
To add subtitles, I selected “Subtitles” and hit “Auto-subtitle in English.” There are plenty of languages to choose from!
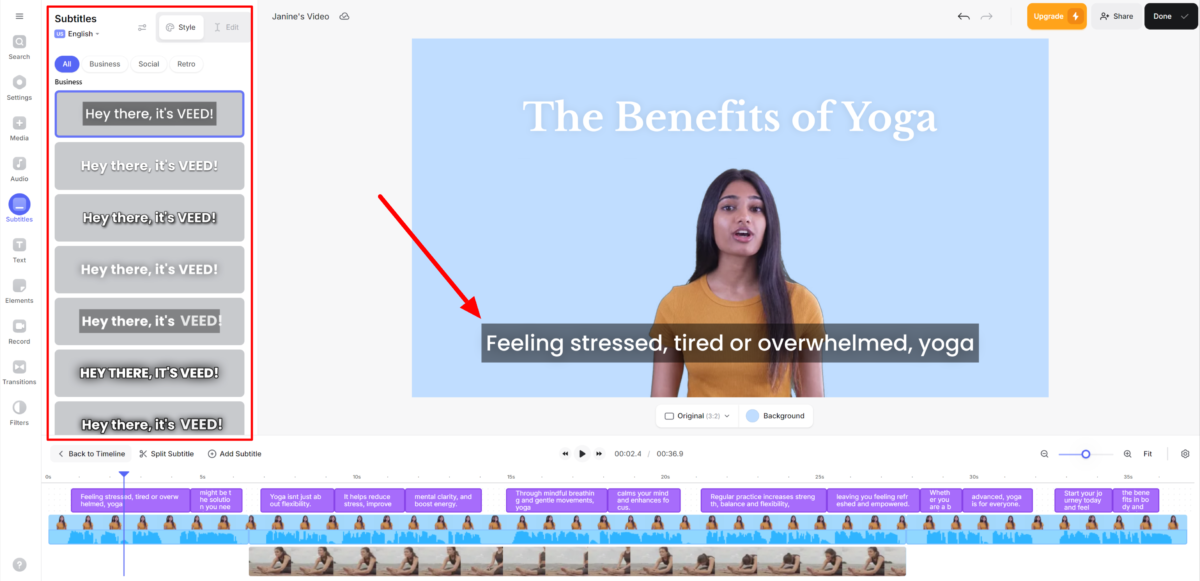
A few seconds later, Veed generated my subtitles! I was impressed with their accuracy and liked the many style options I could choose from.
Step 11: Add Background Music
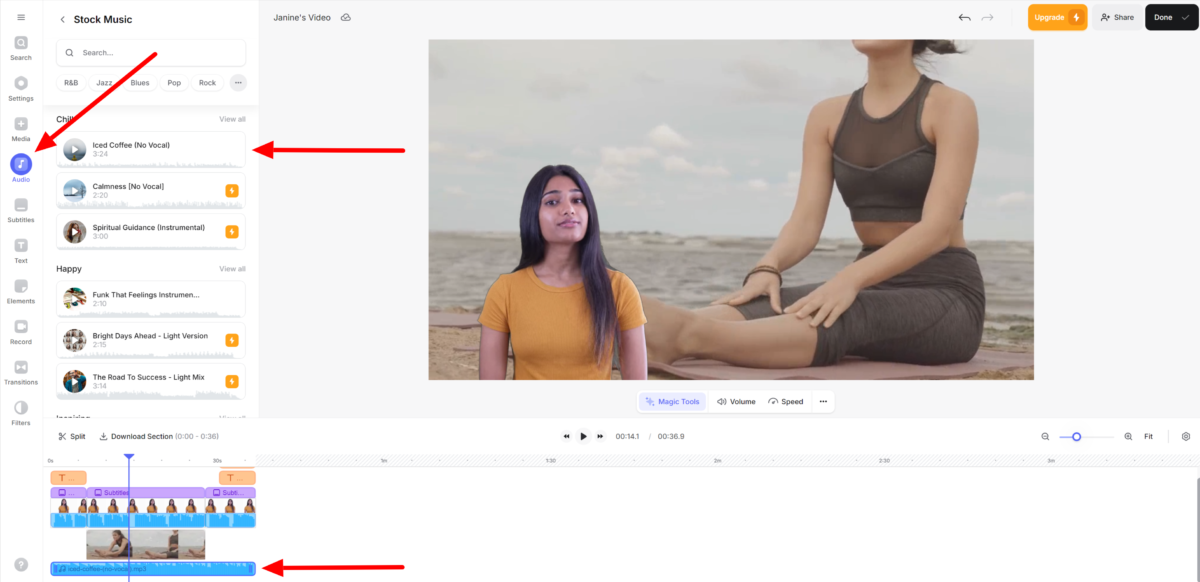
Next, I wanted to add some background music to tie everything together. I selected “Audio” and searched for some soothing stock music that suited my yoga video. Veed organized their stock music nicely, making it easy for me to find relaxing music that fit my topic.
Once I found a song I liked, I hit the “+” button to add it to my timeline and trimmed it! Alternatively, you can upload your own music or add sound effects.
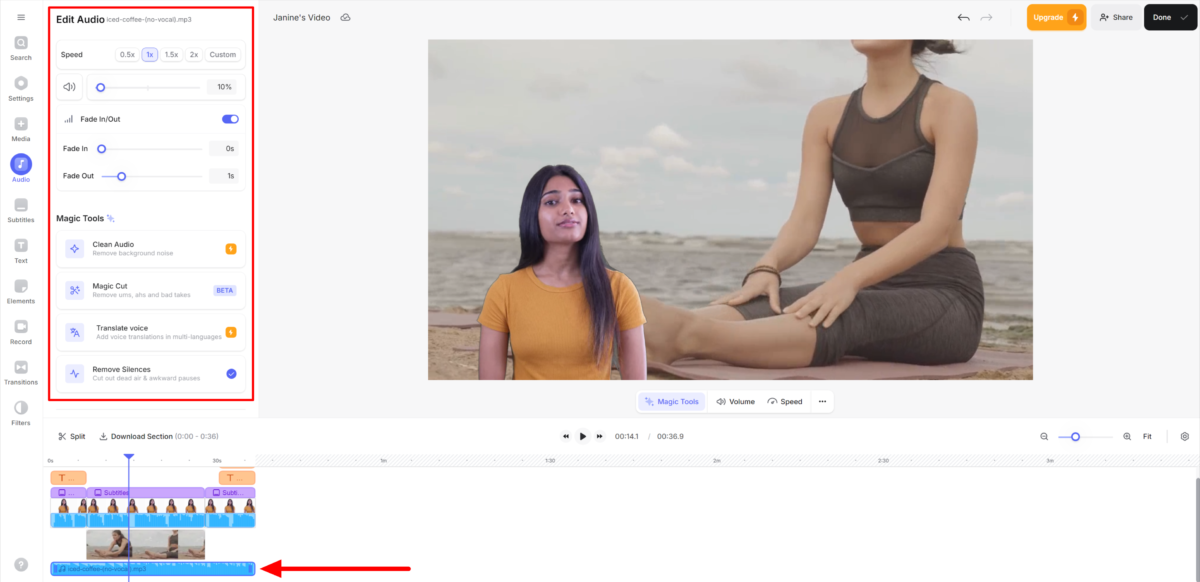
Selecting the audio from the timeline opened my audio editing options. Here, I could adjust the speed and volume, fade in/out, and use AI tools to remove background noise, bad takes, silences, and more!
Step 12: Export Your Video!
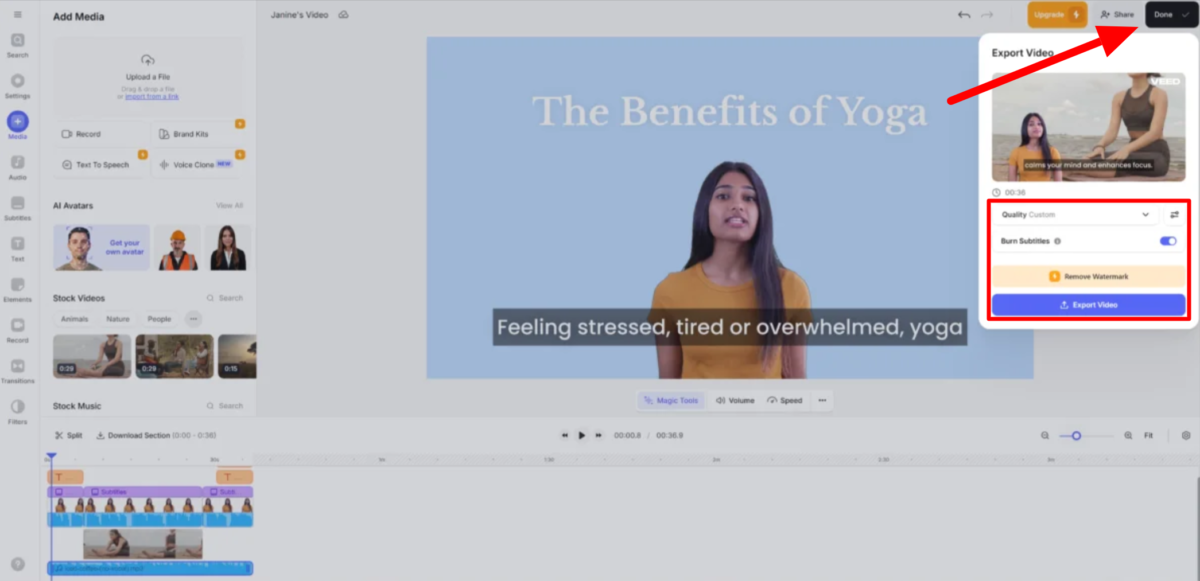
At this point, I was happy with the video I created with Veed. I hit “Done” on the top right, which opened a preview of my video with export settings.
Within the export window, I could choose the quality, framerate, resolution, and compression. I appreciate all the options I have had!
Once I was happy with my settings, I hit “Export Video.” Veed rendered my 30-second video in only a few seconds, and I could download it as an MP4, MP3, or GIF.
Here’s how the video came out:
Overall, Veed made video creation simple and intuitive, even for beginners. The seamless AI tools, like auto-subtitles and avatars, saved me time while delivering professional results!
As you begin to use Veed for video editing, don’t expect to become a pro overnight. Give it time to get comfortable with all the features. Before you know it, you’ll be whipping up videos in no time!
One last tip: don’t be afraid to experiment. Veed.io has a ton of features that aren’t immediately obvious. Play around with different effects, try out the green screen tool, and experiment with the speed of your clips. You’d be surprised at how many happy accidents happen when you’re just messing around and having fun!
Veed.io is a powerful tool that’s surprisingly easy to use. Dive in, start playing around, and before you know it, you’ll be creating videos like a pro!
6 Tips for Getting the Most Out of Veed.io
If you really want to get the most out of Veed.io, here’s what you should do:
- Organization is key. Name all your clips before you start editing. It takes a few extra minutes upfront but will save you hours of headache later!
- Use keyboard shortcuts. Once I started using them, my editing speed doubled! For example, “S” is great for splitting clips, and “Ctrl + K” lets you search for any tool when editing.
- Take advantage of the green screen tool. It’s excellent for quick, fun edits that will transport you anywhere.
- Use templates to optimize your workflow. They’re especially useful if you regularly make similar types of videos. They’ll save you a ton of time in the long run!
- Batch your tasks. Instead of editing one video from start to finish, do all your trimming first, then all your text additions, audio adjustments, etc. It’ll help you get into a groove and work faster.
- Take advantage of the tutorials on the Veed YouTube channel and their other resources. You can find them under “Resources” on the Veed website!
The key is to dive in and start experimenting. You’ll inevitably make mistakes, but that’s how you learn!
Top 3 Veed.io Alternatives
Here are the best Veed.io alternatives I’ve tried.
Pictory
The first Veed.io alternative I’d recommend is Pictory. I love Pictory because it makes content creation effortless by automatically turning my scripts into polished videos!
Veed.io and Pictory are easy-to-use, cloud-based video editing tools catering to content creators, businesses, and marketers. Pictory stands out with its AI-powered ability to turn scripts or blog posts into videos to automate the content creation process. Meanwhile, Veed.io offers collaboration features and AI tools, like Magic Cut and background noise removal.
Both platforms handle subtitles and captions well. However, Pictory stands out for effortlessly creating highlights from long videos, making it more efficient for repurposing content.
The key difference between Veed and Pictory lies in their scope: Veed.io offers a broader set of video editing options for various formats, such as vlogs and marketing videos. Meanwhile, Pictory is hyper-focused on turning text into videos and maximizing SEO impact.
If you want to create content quickly from scripts and blog posts, choose Pictory. However, if you need team collaboration and a wider range of AI tools for video editing, choose Veed.io!
Synthesys
The next Veed.io alternative I’d recommend is Synthesys. Synthesys is excellent for generating highly realistic voiceovers and avatars in minutes for effortless content creation.
While both platforms offer various AI features, Synthesys stands out with its 400+ realistic voices and 70+ avatars. Synthesys is an excellent choice for creating high-quality voiceovers and videos with AI avatars.
On the other hand, Veed.io offers an incredibly user-friendly drag-and-drop interface and collaboration tools, making it a fantastic option for teams creating marketing and social media content. Plus, its AI tools help streamline video editing.
The key difference between Veed and Synthesys is that Veed.io focuses more on video editing ease and flexibility. Meanwhile, Synthesys emphasizes high-quality voiceovers, video creation, and AI avatars on one platform! Both tools offer robust features, but Synthesys produces more realistic, high-quality audio and video content, especially for businesses that require multilingual options.
If you’re looking for AI-generated voiceovers and avatars that look and sound realistic, choose Synthesys. For a user-friendly, collaborative video editor to create all sorts of content, Veed.io is your best bet!
Deepbrain AI
The final Veed.io alternative I’d recommend is Deepbrain AI. I love Deepbrain AI for its hyper-realistic avatars and its effortless ability to convert text into engaging video content. While both platforms simplify video creation, their approaches are unique.
On the one hand, Veed.io stands out with its drag-and-drop interface and AI-powered tools like Magic Cut and background noise removal. These features make Veed great for quick edits, especially for social media and marketing content.
Veed also comes with excellent collaboration tools, stock libraries, and a variety of export options. However, the free version is limiting, and AI avatars sometimes feel unnatural.
Meanwhile, Deepbrain AI uses advanced AI avatar technology and text-to-video to generate videos automatically. It features over 200+ hyper-realistic AI avatars that speak 80+ languages to create professional video content without a camera crew. It also converts blogs, PDFs, and URLs into videos to streamline your workflow and reduce production costs by 80%!
If you’re looking for a user-friendly platform for quick video edits, Veed.io is an excellent choice! However, I’d recommend Deepbrain AI for higher-quality AI avatars and advanced text-to-video features.
Veed.io Review: The Right Tool For You?
Overall, Veed.io exceeded my expectations as a web-based video editor. Right off the bat, I loved how intuitive the interface was. Finding and using the editing tools was effortless, saving me a lot of time compared to more complex software like Premiere Pro. The learning curve was practically nonexistent, allowing me to jump right into creating content without any frustration!
However, Veed is not the best if you’re dealing with large video files or need more advanced editing capabilities. The free version feels too restricted, and the AI avatars still need some refinement. Regardless, Veed is an excellent choice for quick, clean, and efficient editing!
If you’re curious about Veed alternatives, here are my top picks that I’ve personally tried:
- Pictory is best for YouTubers, marketers, and podcasters who need quick, AI-driven video creation with captions and flexibility across platforms.
- Synthesys is best for marketers looking for realistic, customizable AI-generated voices with minimal effort.
- Deepbrain AI is best for businesses and teachers needing AI avatars and multilingual video content with professional customization options.
Thanks for reading my Veed.io review! I hope you found it helpful.
Veed offers a free plan for casual users and beginners who want to explore basic video editing capabilities. Why not try it for yourself and see how you like it?
Frequently Asked Questions
Is Veed.io completely free?
No, Veed.io is not completely free. While it offers a free plan with limited functionalities, including 720p exports and access to basic editing tools, many advanced features and AI tools are only available through paid plans.
Is VEED a good site?
Veed.io is considered a good site for video editing, mainly due to its user-friendly interface and various features catering to beginners and experienced creators. With Veed, you can edit videos quickly with fast processing speeds. It’s also cloud-based, making it convenient for quick and simple editing from anywhere, so long as you have an Internet connection. However, you may experience occasional issues with upload speeds and buffering with larger video files.
How much does VEED cost?
Veed.io offers several pricing plans to accommodate different needs. The free plan includes limited editing features, while the Lite plan offers watermark removal. The Pro plan gives you access to all of Veed’s AI tools, while the Enterprise plan offers custom pricing for teams who want to scale their video creation.
Do YouTubers use VEED?
Yes, YouTubers use Veed. The platform is designed to streamline the video editing process for various types of content, including YouTube videos. It’s particularly appealing for creators looking for an easy-to-use editing solution with features like auto subtitles, templates, and a drag-and-drop interface.
Is VEED trustworthy?
Yes, Veed.io is trustworthy. I used it to create, edit, and export a video on the benefits of yoga! Many love its user-friendly interface, responsive customer support, and practical video editing features. It simplifies the video creation process without requiring extensive technical skills. However, some negative reviews mention performance issues when uploading personal media.
The post Veed.io Review: The Easiest AI Video Editor I’ve Ever Used appeared first on Unite.AI.


